Enhanced Workflow Overview
The purpose of this document is to provide an overview of the Enhanced Workflow version of the Campaign screen within Cheetah Digital. This document describes the key differences between the Enhanced Workflow Campaign screen and the existing "classic" Campaign screen, and highlights the new features and functionality provided by the Enhanced Workflow version.
The intended audience for this document are Messaging users who are familiar with how to use the existing Campaign screen.
Project overview
The Enhanced Workflow Campaign screen is part of a series of workflow enhancements aimed at improving the user experience -- from campaign creation to launch. These enhancements are being rolled out utilizing a phased approach, so as to minimize disruption to our users' existing workflows and campaign strategies
The Enhanced Workflow is now the standard, default Campaign screen. When you create a new Email Campaign, or select an existing Email Campaign, the Enhanced Workflow screen will be displayed.
For Email Campaigns that DON'T use Cells and Splits, the "classic" Campaign screen is no longer supported; you must use the Enhanced Workflow for configuring and launching the Campaign.
For Email Campaigns that DO use Cells and Splits, the Enhanced Workflow is available in parallel with the existing "classic" Campaign screen, meaning you can choose to work in either screen as desired (the best practice is to use the Enhanced Workflow).
Highlighted features
The key new features unique to the Enhanced Workflow Campaign screen are as follows:
-
A cleaner, more streamlined user interface.
-
A larger content editing space with formatting enhancements designed to improve the readability of your HTML code. These enhancements include color-coding HTML tags, highlighting Merge Symbols, and inline editing of certain asset types.
-
An integrated Link Tracking section to make it easier to manage and track links within your content.
-
Support for "deep links."
-
Usability improvements to the Personalization Pane where you select personalization fields and other assets.
-
Integration with Return Path, a third-party email marketing solution that's designed to increase subscriber engagement, as well as to increase your return on investment for email Campaigns.
-
A "multi-edit" feature for Cells & Splits, that allows you to populate the different versions of a testing element across all sub-cells, from within the same screen.
-
Support for additional Split Cell testing elements not available in the "classic" screen, including Metadata and Special Processing Steps.
-
Support for repeatable Append Code sets.
-
Support for Quick Proofs with custom Personalization values.
-
Unique testing options when setting up an A / B Test, including using "Unique Opens" or "Web Events" as the winning condition. Also, if deploying the winning cell manually, you can configure a reminder email notification to get sent at a designated interval after deployment, to remind you that you need to manually deploy the winning cell.
-
Support for Push Notification "templates"
-
The Content Designer -- a simple way to create responsive email messages via a graphical, drag-and-drop interface; the Content Designer is intended for users who prefer not to code in HTML.
-
Support for Sent Time Optimization (STO). STO will deploy messages to recipients based on each recipient's preferred send time.
-
Support for Campaigns that use the Engagement Data Platform (EDP) as the data source, instead of a Messaging table.
Unsupported features
The following features aren't yet supported in the Enhanced Workflow Campaign screen. If you need to use one of these features, you'll need to continue to use the classic Campaign screen.
-
SMS Campaigns that use a Messaging table as their data source
-
Custom Responses
-
Keyword Responses
Access
The Enhanced Workflow is now the standard, default Campaign screen. When you create a new Email Campaign, or select an existing Email Campaign, the Enhanced Workflow screen will be displayed.
For Email Campaigns that have Cells and Splits, you can toggle to the classic Campaign at any point by clicking the Classic Workflow button in the Tool Bar. Be sure to save your changes before you leave the Enhanced Workflow Campaign screen. If you have unsaved changes, the platform will prompt you to either proceed and discard the unsaved changes, or to save your changes before exiting.

To toggle back to the Enhanced Workflow, click the Enhanced Workflow button in the Tool Bar.
The Enhanced Workflow Campaign screen is available only for Campaigns in the Email and Push Notification channels. The long-term plan for this project is to roll out the Enhanced Workflow Campaign screen to other channels; for now though, if you're building a Campaign in some other channel, such as SMS Text for example, you won't be able to utilize the Enhanced Workflow Campaign screen.
Navigation
This screen is organized around the main stages of building and launching a Campaign. Each of these stages is accessible through a chevron at the top of the screen. These chevrons allow you to walk through the Campaign process in a more linear, streamlined fashion.

The main stages are:
-
Setup -- Configure high-level details of the Campaign.
-
Content -- (not displayed for the Push Notification channel) Enter the email message content and configure link tracking.
-
Review -- Schedule the Campaign, send proofs, and run audits.
-
Status -- Launch the Campaign, approve launch steps, and check the Campaign status.
-
Analytics -- Available for EDP-driven Camapigns only; view Campaign operational reports.
Each of these stages is described below in more detail.
Tool bar
Additional features and options are available within the Tool Bar at the top of the Enhanced Workflow Campaign screen. The Tool Bar also displays important information about the Campaign, such as the Campaign type, identifiers, source table, and status.

To rename a Campaign, simply type in the new name within the Campaign name field.
From the Settings menu in the Tool Bar, you have access to the following features:
-
Set Campaign Metadata
-
Set Time Zone for all scheduling-related features
-
Configure Report Settings
-
Configure Personalized URL (PURL) Options
-
Enter Email Headers (blind carbon copy email address and reply-to email address)
From the "Actions" menu in the Tool Bar, you have access to the following features:
-
Add / Undo Cells and Splits
-
Send Quick Proof (this action is also available from a link in the Review section)
-
Change Campaign Type
-
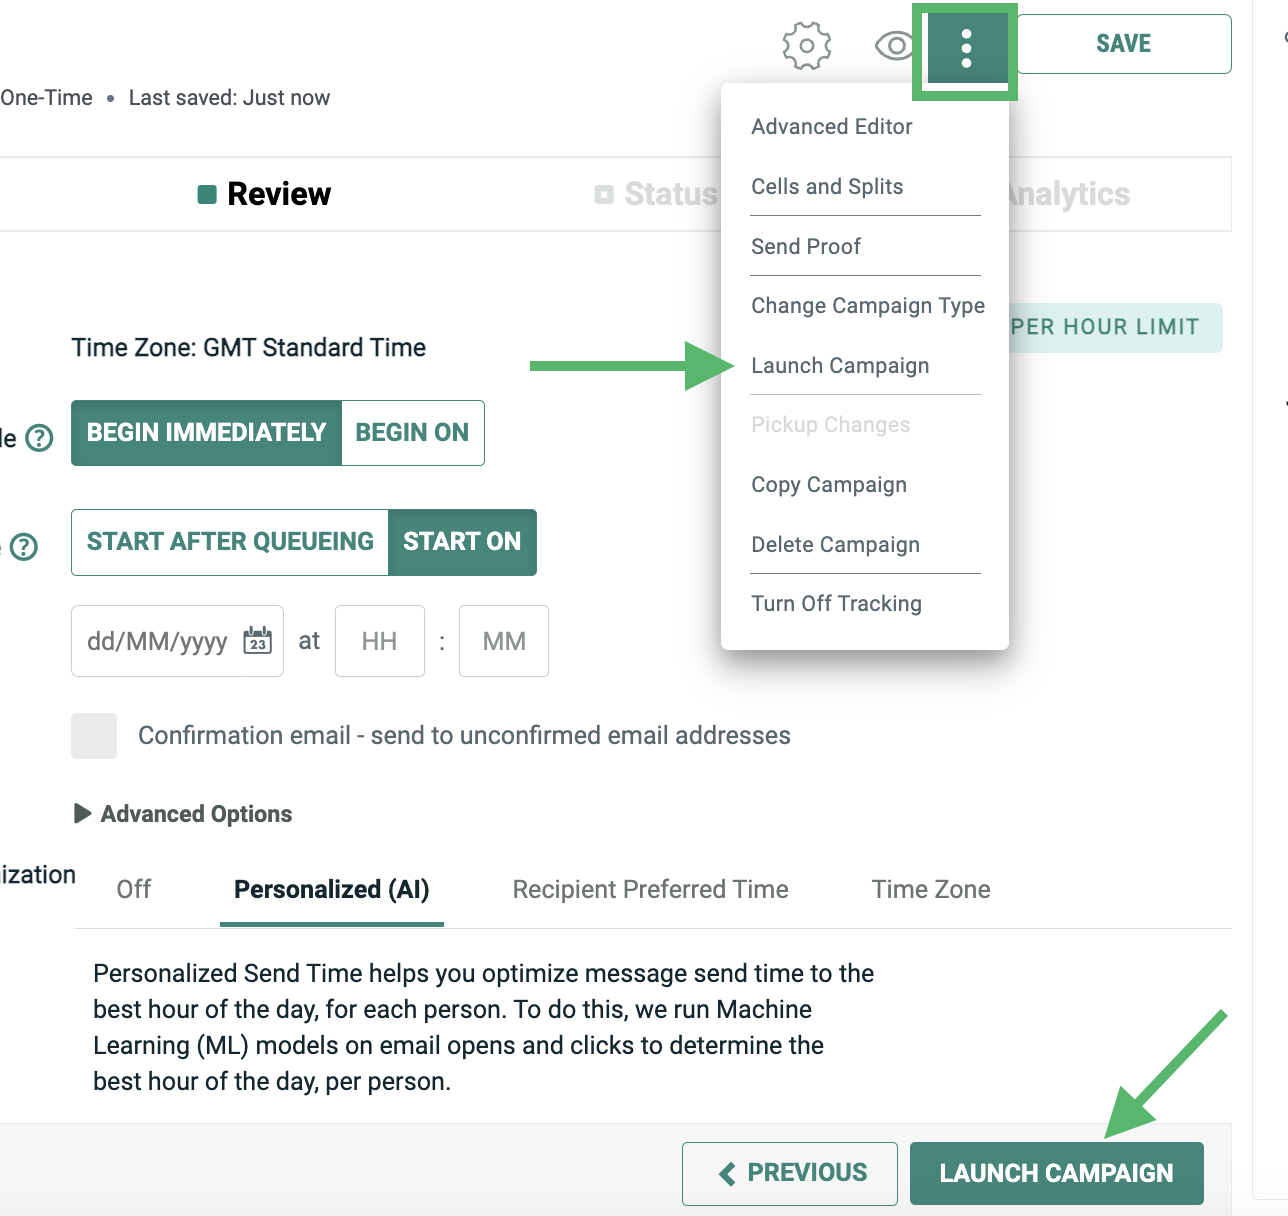
Launch Campaign (this action is also available from a button at the bottom of the Review section)
-
Pickup Changes (this action is also available from a button at the bottom of the Status section)
-
Copy Campaign
-
Delete Campaign
-
Advanced Edit -- for users utilizing the Content Designer, you can switch over to using the Content Editor instead.
If you click the Preview button in the Tool Bar, the Preview Window is displayed (see Content for more details on this feature).
To save the current Campaign, click Save. This button is enabled only if you currently have unsaved changes.
Setup
the Setup section is displayed by default when opening a Campaign. Click Setup in the navigation bar to toggle back to it at any time.
This section is used to configure many of the options and parameters for your Campaign, and to assign additional assets to the Campaign:
-
Trigger: For an Event-triggered Campaign, select the trigger type, and configure the criteria for that trigger.
-
Audience: Select a Filter, and select the desired email address or Push Registration ID field on the Campaign's source table.
-
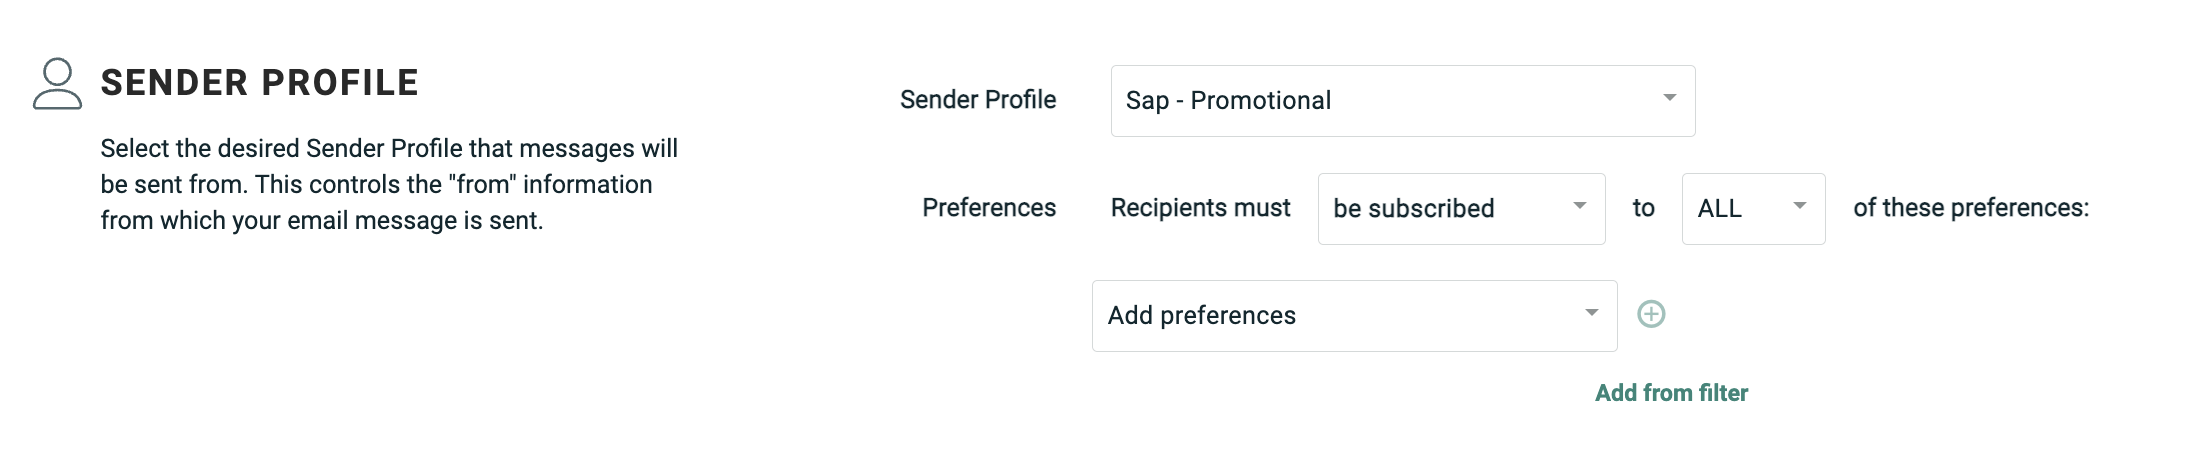
Sender Profile: (Email channel only) Select a Sender Profile and optionally a VMTA Pool.
-
Application Group: (Push Notification channel only) Select an Application Group and Push Notification Template.
-
Push Payload: (Push Notification channel only) Select or enter the desired values in the Push Notification Template fields.
-
Envelope: (Email channel only) Enter message envelope options, such as the friendly-from address and the subject line.
Additional features are available from the Advanced Options menus in the Audience and Envelope sub-sections.
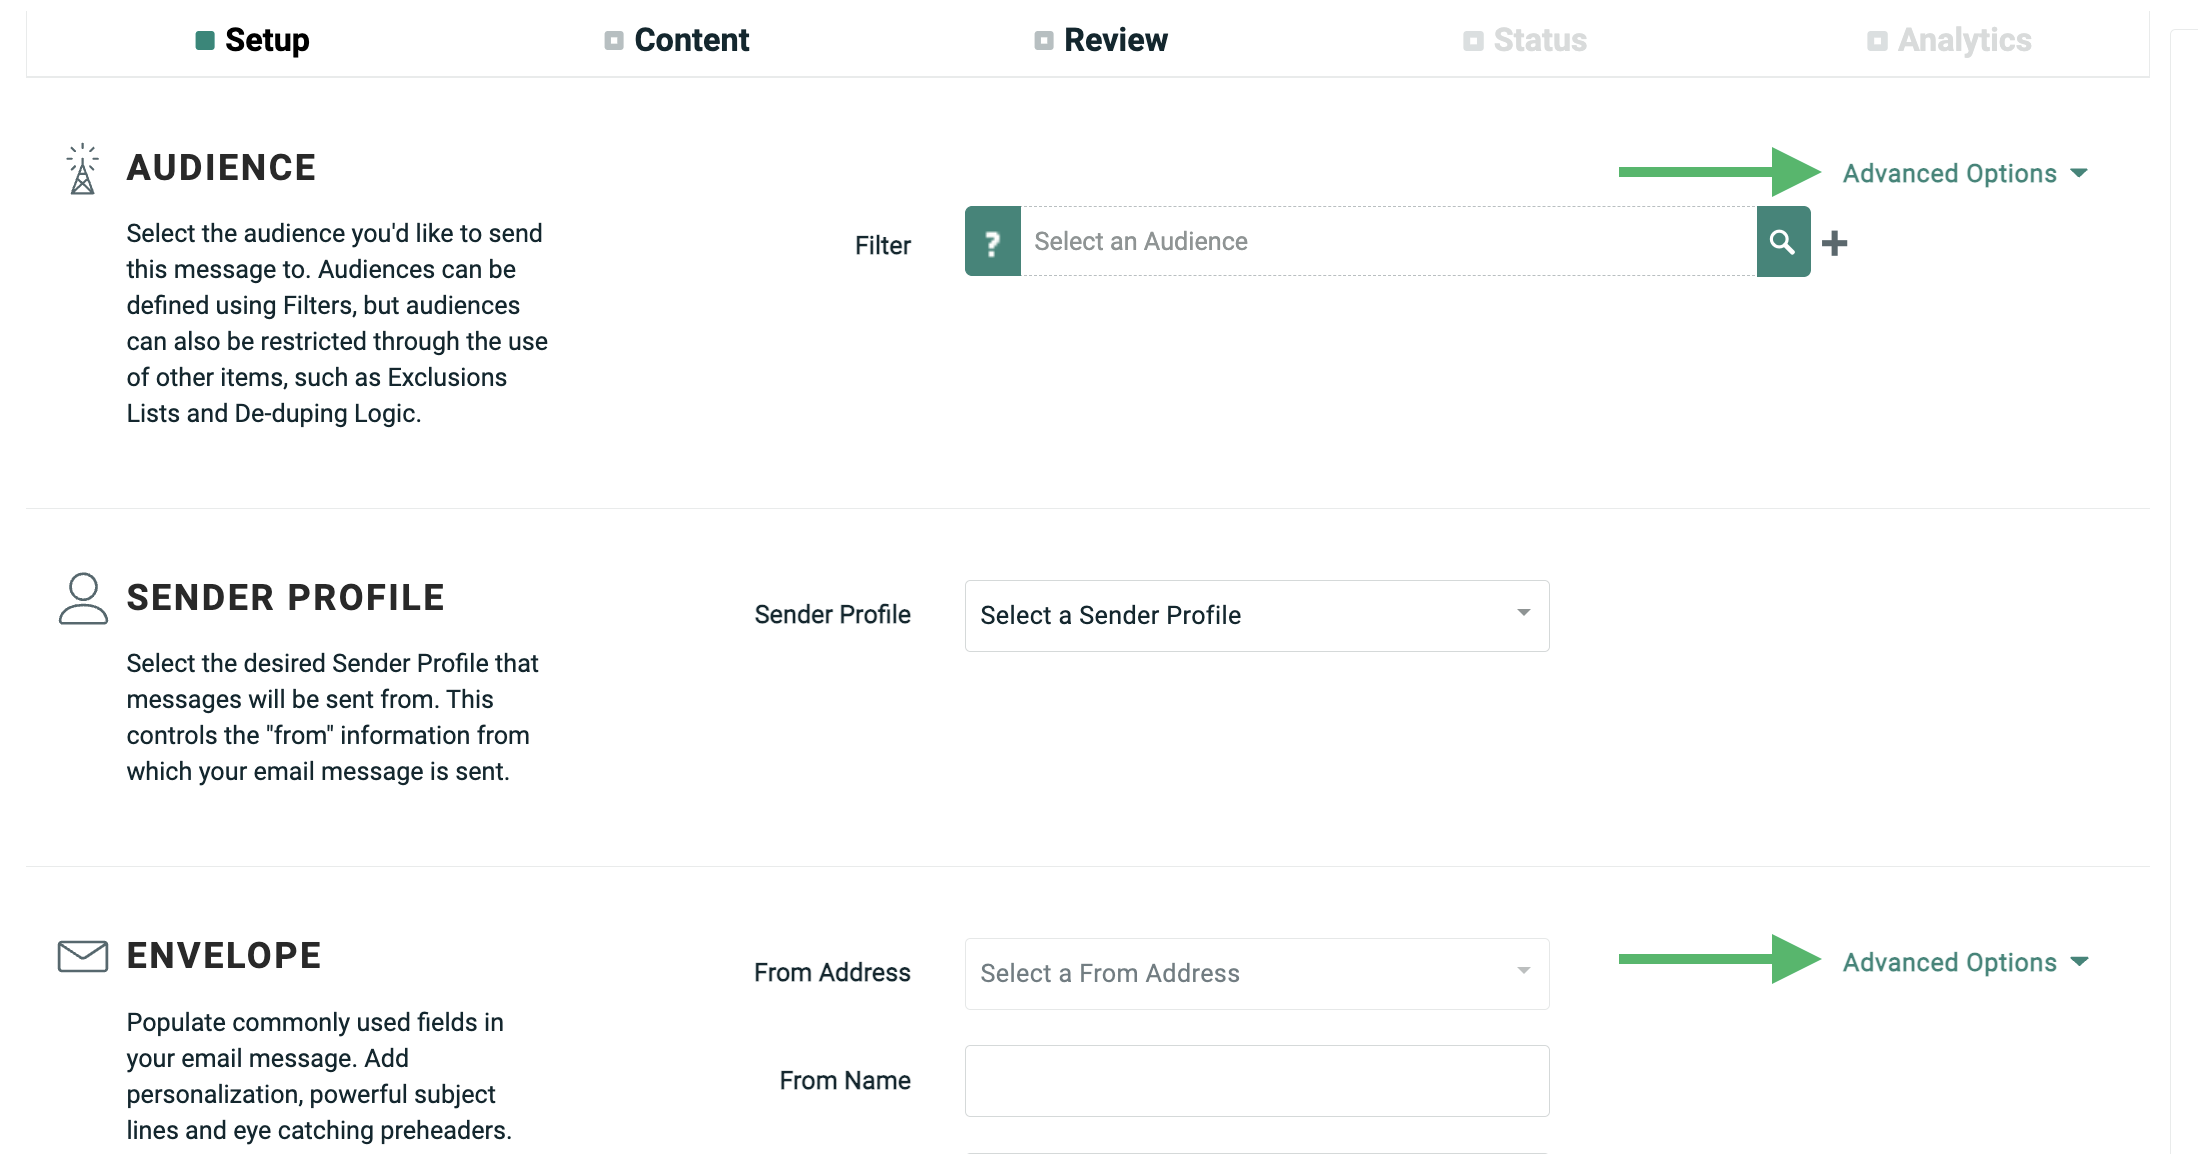
In the Audience sub-section, you can access the following Advanced Options:
-
Add Exclusion Lists
-
Add a Seed List (Regular One-off and Date-triggered Campaigns only)
-
Use Filter as Seed List
-
Add De-Deduping Logic
-
Add Total Send Limit
-
Add Special Processing
-
Limit per Unique ID
In the Envelope sub-section of the Enhanced Workflow Campaign screen, you can access the following "Advanced Options:"
-
Add Attachments
-
Add Reply-handlers
If you're using Preference flags for permission management, the Enhanced Workflow Campaign screen provides additional functionality not supported in the classic Campaign screen. With the Enhanced Workflow, you can choose to select recipients who are either subscribed or not subscribed. You can also define AND or OR conditions when using multiple Preference flags; the classic Campaign screen supports only the use of an AND condition.
When you're finished configuring the options in the Setup section, you can click the "Content" chevron, or click the Next button at the bottom of the screen to proceed to the Content section (Email channel) or the Review section (Push Notification channel).
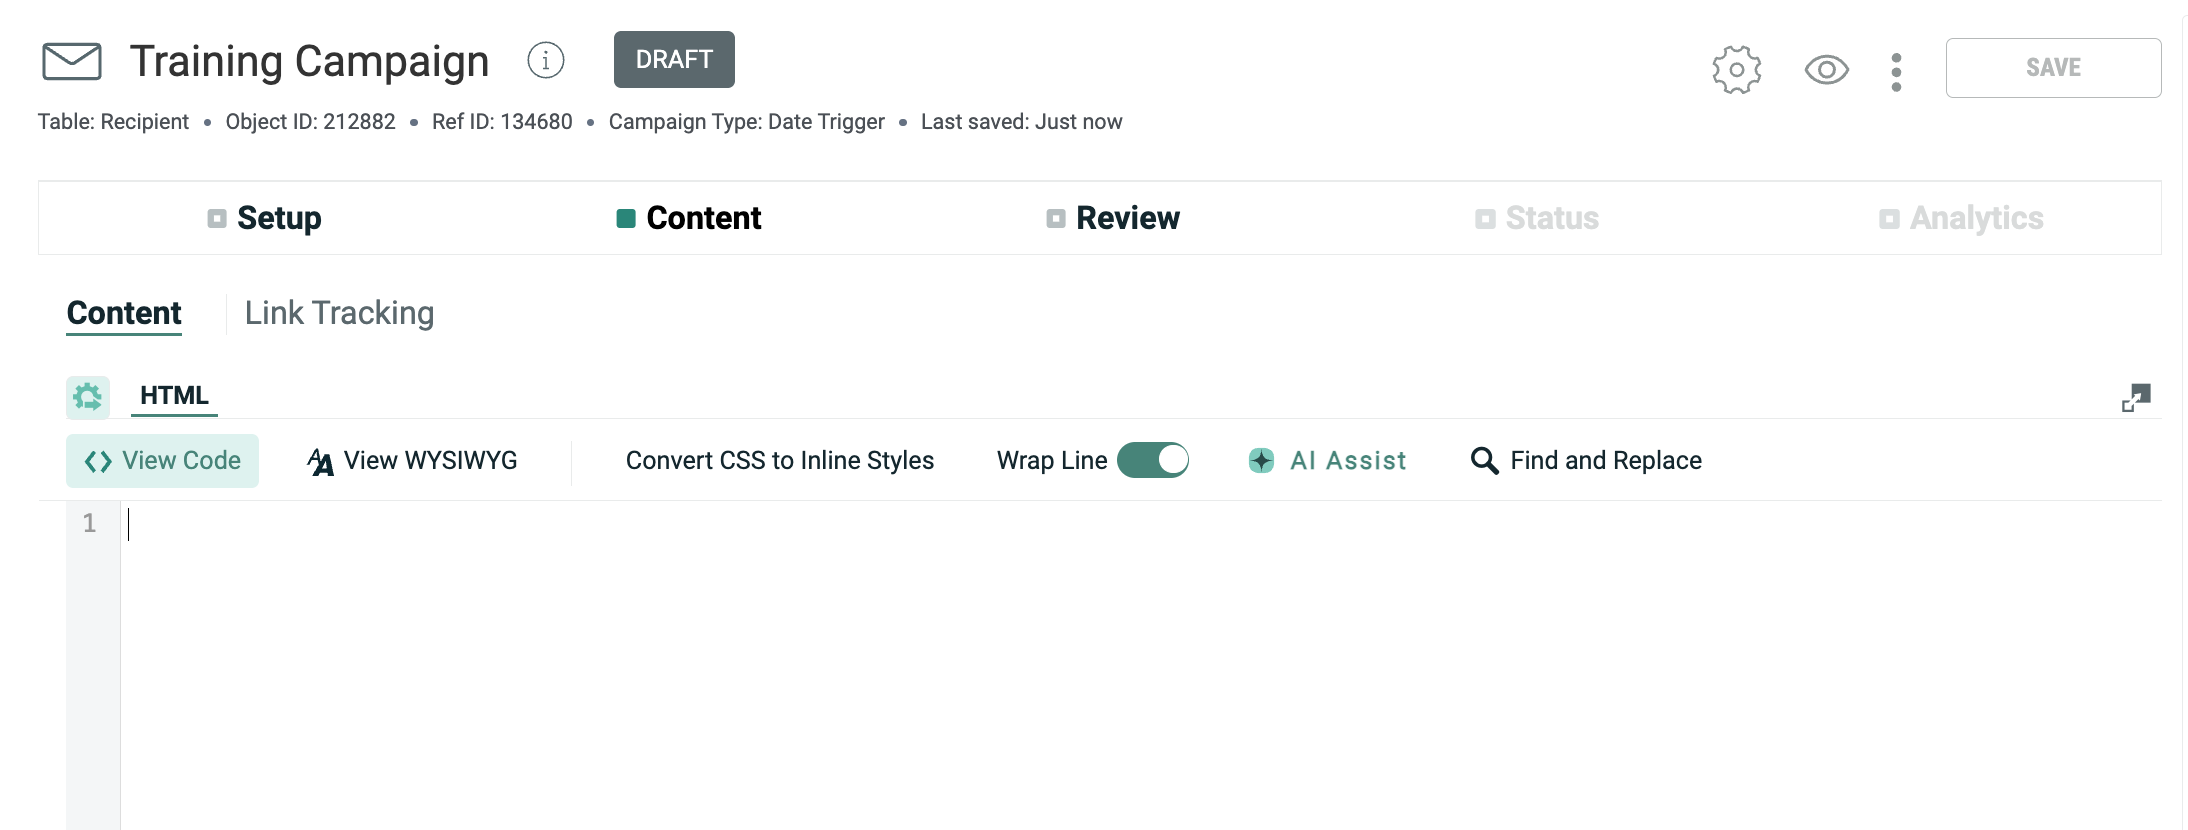
Content
The Content section of the Enhanced Workflow Campaign screen represents one of the biggest improvements over the classic Campaign screen. The Enhanced Workflow screen provides sophisticated content creation and editing tools, integrated link tracking options, and easier access to assets and items, such as Content Blocks and personalization fields.
The Content section supports two different tools for entering message content:
-
Advanced Editor: A full-featured HTML code editor
-
Content Designer: A visual, drag-and-drop interface, intended for users who prefer not to work directly with HTML
The Content section is divided into two main components, which are accessible using the two links at the top of the screen:
-
Content: Enter the content of your Campaign
-
Link Tracking: Select and configure the links in your message content that you want to track
Advanced editor
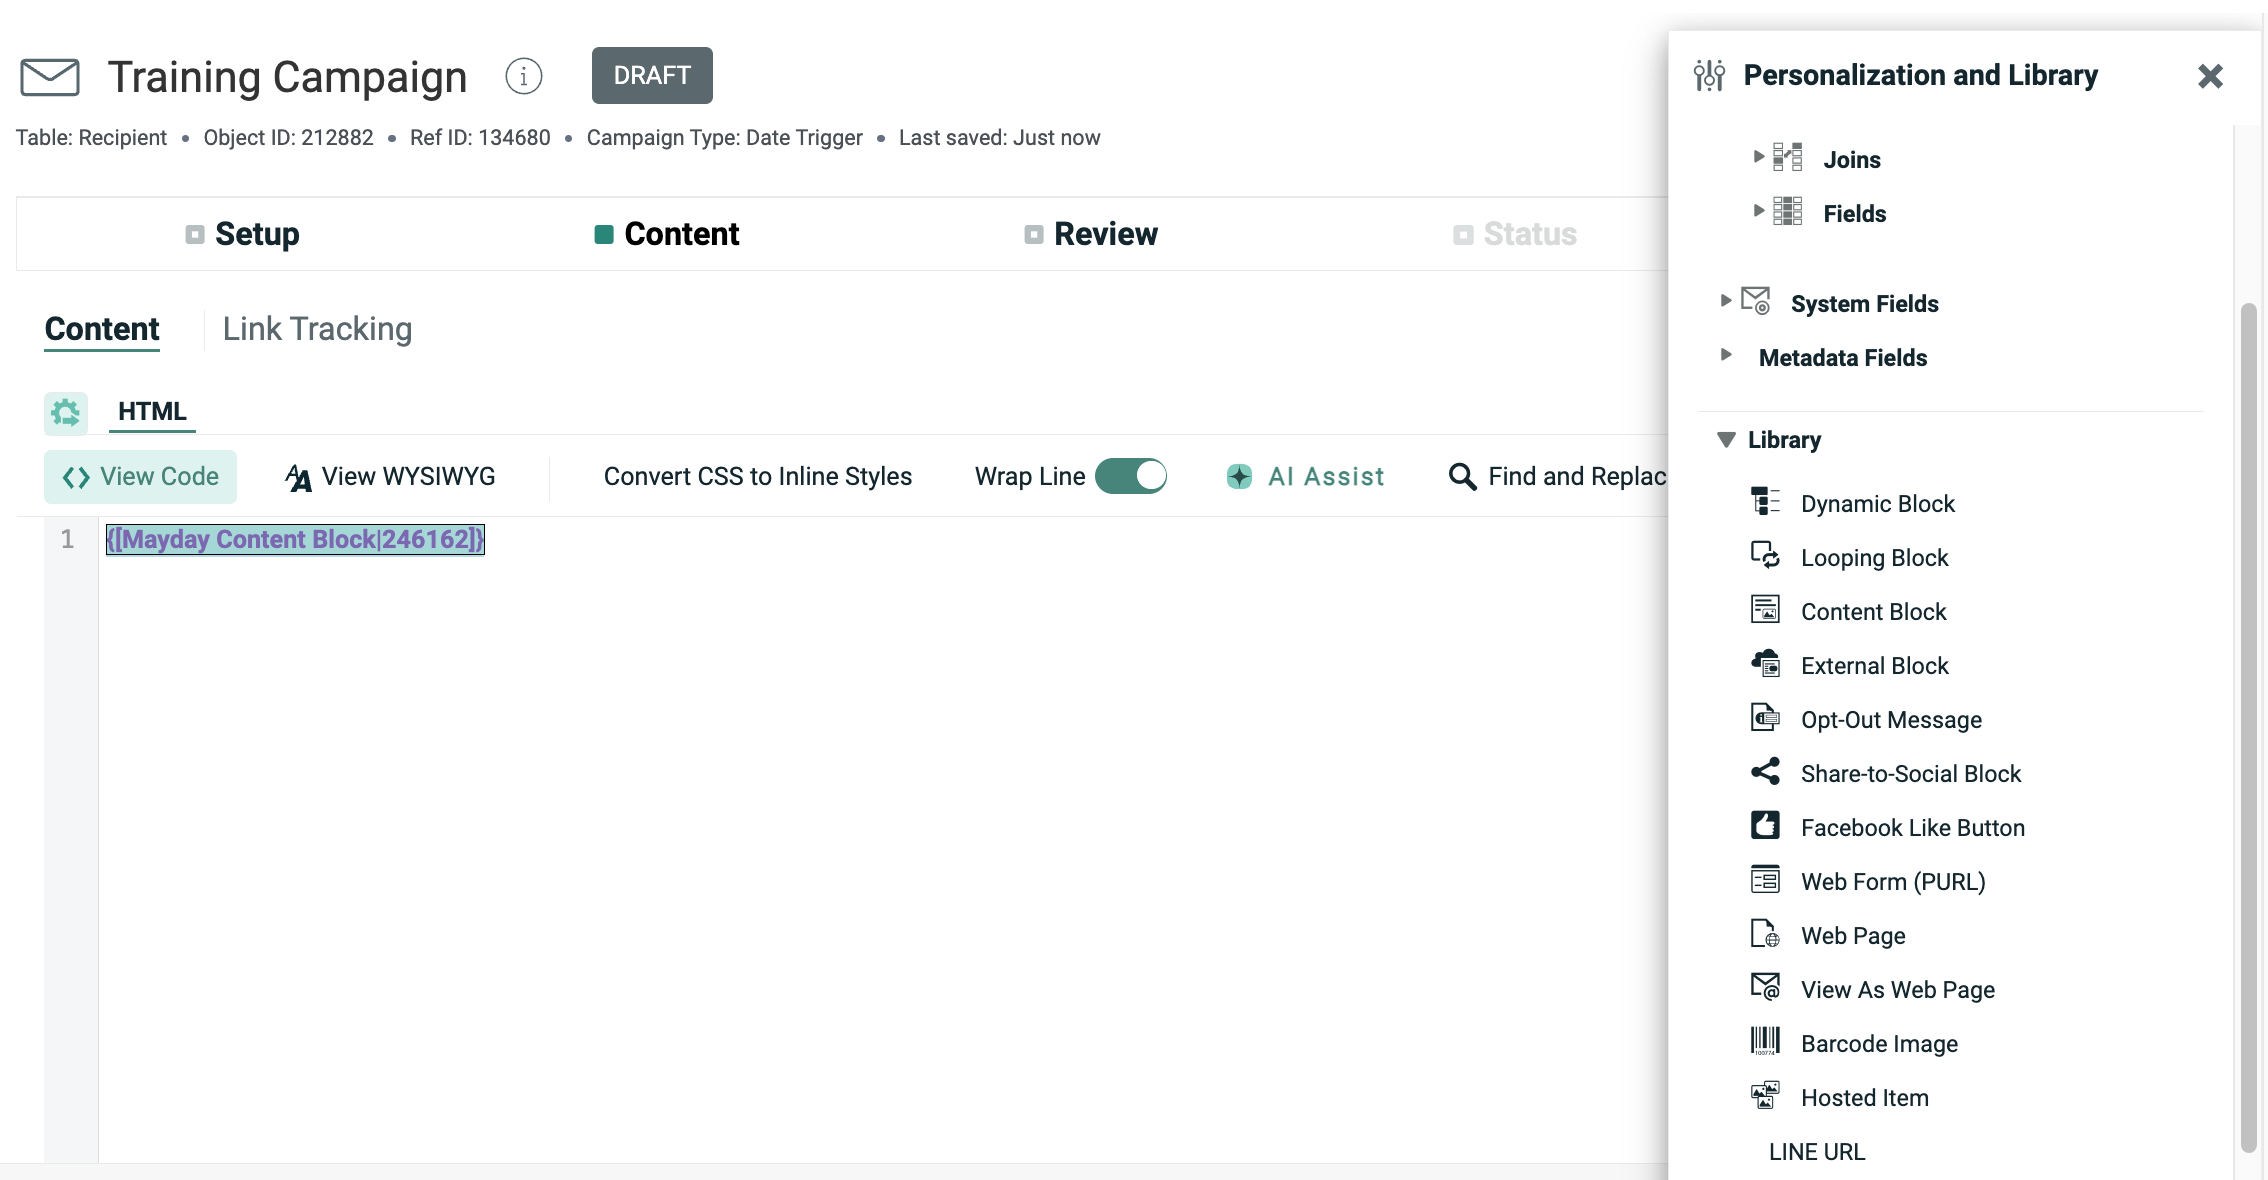
The basic layout of the Enhanced Workflow Advanced Editor should be recognizable to anyone who's used the classic Content Editor. The screen comprises a large text editor where you enter your HTML / Plain Text content. Different format versions of your email content are listed across the top of the screen as separate tabs. The Personalization Pane is displayed along the right-hand edge of the screen.
The Advanced Editor provides a larger editing space than the classic version, along with several formatting enhancements designed to improve the readability of your HTML code. As illustrated in the comparison below, these enhancements include line numbers, color-coding HTML tags, and highlighting Merge Symbols to make them easier to find within the message.
Additional editing options are displayed above the Advanced Editor, including the option to toggle on / off word wrapping, a CSS-to-inline style convertor, and an HTML-to-plain-text convertor.
If you want more space on the screen for the HTML editor, click ExpandContent Editor. The platform collapses several of the UI controls in order to expand the HTML editor. Click this same button again to revert back.
For users who aren't proficient in HTML coding, the screen offers an integrated WYSIWYG (What You See Is What You Get) editor. This editor is similar to a word processor, and provides a tool bar with common functions, such as fonts, links, and typefaces. The platform will automatically convert this content into HTML.
By default, the platform displays the HTML code editor. To switch from the HTML code editor to the WYSIWYG editor, click WYSIWYG. To toggle back to the HTML editor, click Code.
Note: the WYSIWYG editor is not to be confused with the Content Designer tool described below. The WYSIWYG editor simply provide access to common formatting options and controls; conversley, the Content Designer is a full-featured content creation tool.
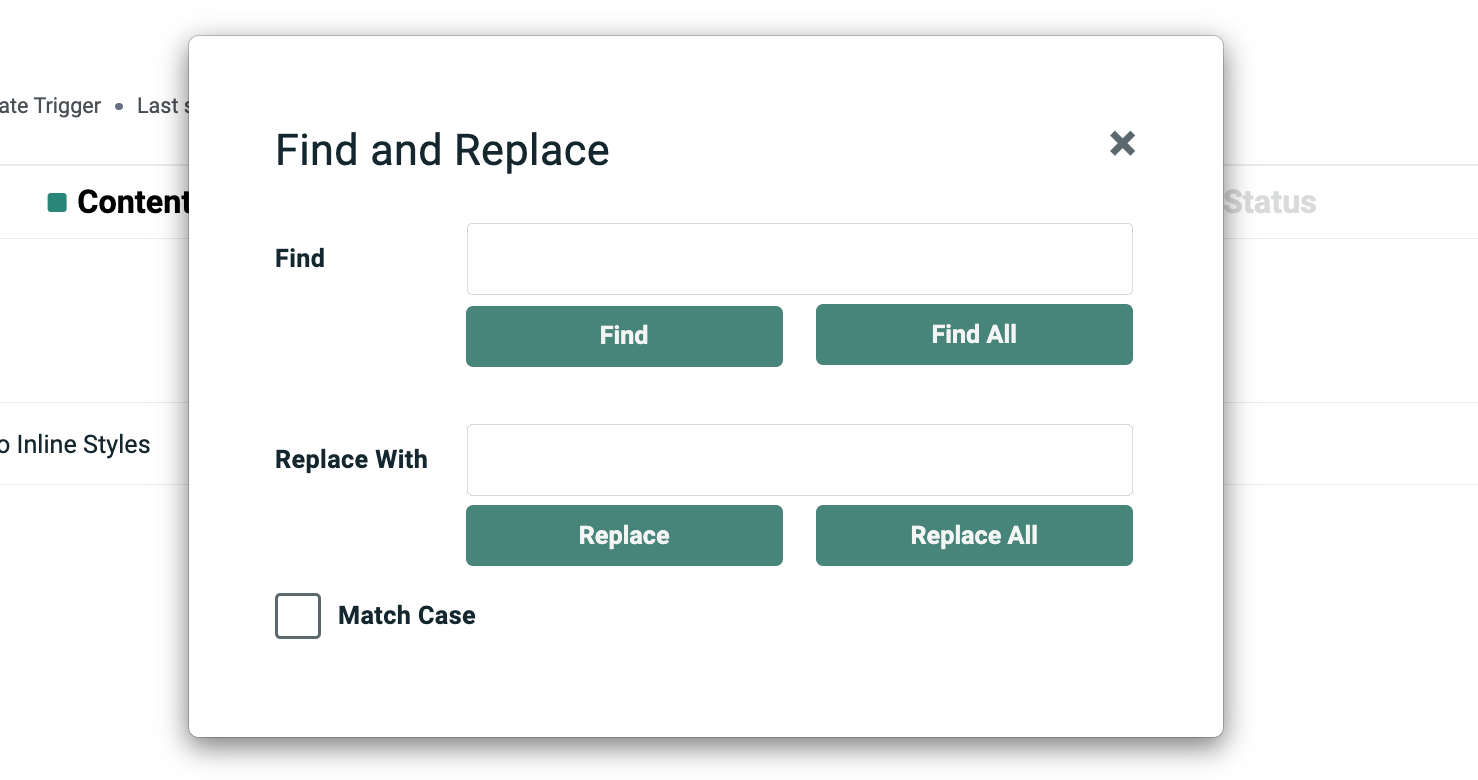
The Search function has also been enhanced. The classic Content Editor has a simple search tool that highlights the first instance of a text string within your HTML or Plain Text. You can then navigate through each subsequent instance of that text string. The Search feature in the Advanced Editor provides increased functionality, such as the ability to navigate backwards and forwards through your content to highlight the desired text string, or to highlight all instances.
In addition to the search functionality, you can now replace a highlighted text string with another text string. You can also perform a global "replace all" across the entire message content.
Personalization pane
The process of adding assets (Content Blocks, personalization fields, etc.) to your email content is generally the same in the new Advanced Editor, but the Personalization Pane itself has been enhanced to make it easier to access and use.
In the classic Content Editor, the Personalization Pane appeared as soon as you clicked anywhere within the Content field, and the system provided no means of collapsing it again. In the Advanced Editor, the Personalization Pane is user-configurable -- it's displayed only when you want it, and you can easily collapse it again to maximize the content editing space.
To open the Personalization Pane, click the bar labeled Personalization & Library along the right-hand edge of the screen.

At any point, you can click the X icon within the Personalization Pane to collapse it again.
The Personalization Pane is a critical tool in building your email message content, as this pane provides access to all of the database fields and assets that you can use in your content.
As with the classic Content Editor, to add an asset such as a Content Block, you drag-and-drop the asset type from the Personalization Pane onto the Content field (or double-click on it), then browse to and select the specific asset that you want. The platform inserts the Merge Symbol for this asset into the email content at the current cursor position.
The Advanced Editor provides several usability enhancements related to the Personalization Pane. First, assets are now better organized through the use of two main categories: Personalization and Library. Each of these categories can be expanded / collapsed as needed.
The Personalization section contains all of the database fields, joined fields, and Metadata fields that you can use to personalize your message content. This section contains a Search tool, and the fields can optionally be sorted by field name, to make it easier to find the desired field.
The Library section contains all of the available asset types (Dynamic Blocks, Content Blocks, etc.).
The Clipboard section that was displayed at the bottom of the classic version of the Personalization Pane has been replicated in the Enhanced Workflow version as the "Included Items" section. When you add Personalization Fields or other assets to the message content, their Merge Symbols are added to the "Included Items" section. This section allows you to quickly find and reuse a Merge Symbol elsewhere in the content, without having to search for it again.
Inline editing
A key new feature of the Advanced Editor is the ability to edit certain types of assets directly from the Advanced Editor screen, without having to navigate to the specific asset detail screen.
As noted above, the Merge Symbols for assets are now highlighted in order to make them easier to find within your HTML code. In addition, you can now click on a Merge Symbol. For certain asset types (Content Blocks, Looping Blocks, and Opt-Out Messages), the platform displays a pop-up panel that displays the details of that asset. You can then make edits to the asset directly within this pop-up panel, and save the changes. You can also jump directly to the asset detail screen.
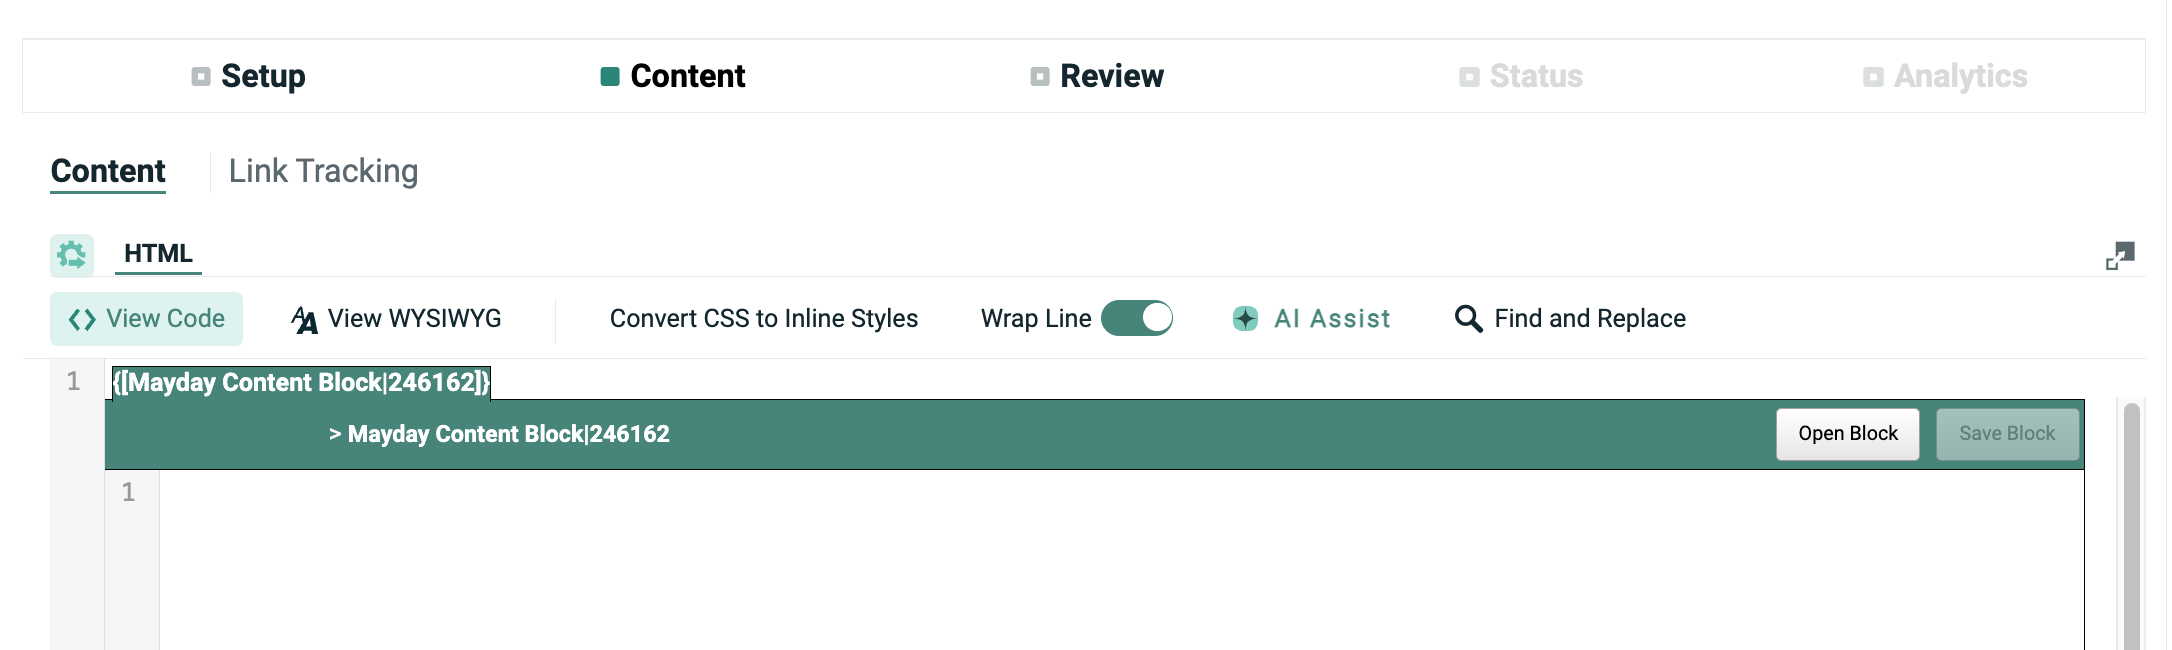
For other asset types (such as Dynamic Blocks or External Content Blocks), you can't perform inline editing from the Advanced Editor; however, the Open Block button allows you to jump directly to the asset detail screen, and you can make your edits there.
Content designer
The Content Designer is a unique feature available only in the Enhanced Workflow. The Content Designer provides a graphical, user-friendly interface for building email content via a drag-and-drop interface. The Content Designer is primarily intended to be used by marketers who prefer not to work with HTML. The Content Designer automatically produces responsive email messages that adapt automatically to small screens, such as that of a smartphone.
The Content Designer is an optional feature that must be enabled within a client account. If the Content Designer is NOT enabled, then the user will see the Content Editor when he or she clicks the "Content" chevron. If the feature is enabled, the user will see the Content Designer instead.
When you use the Content Designer, you can save the content as a repeatable asset called a Design. When you navigate to the Content tab for a new Campaign, you'll be prompted to either select an existing Design, or to create a new one from scratch.
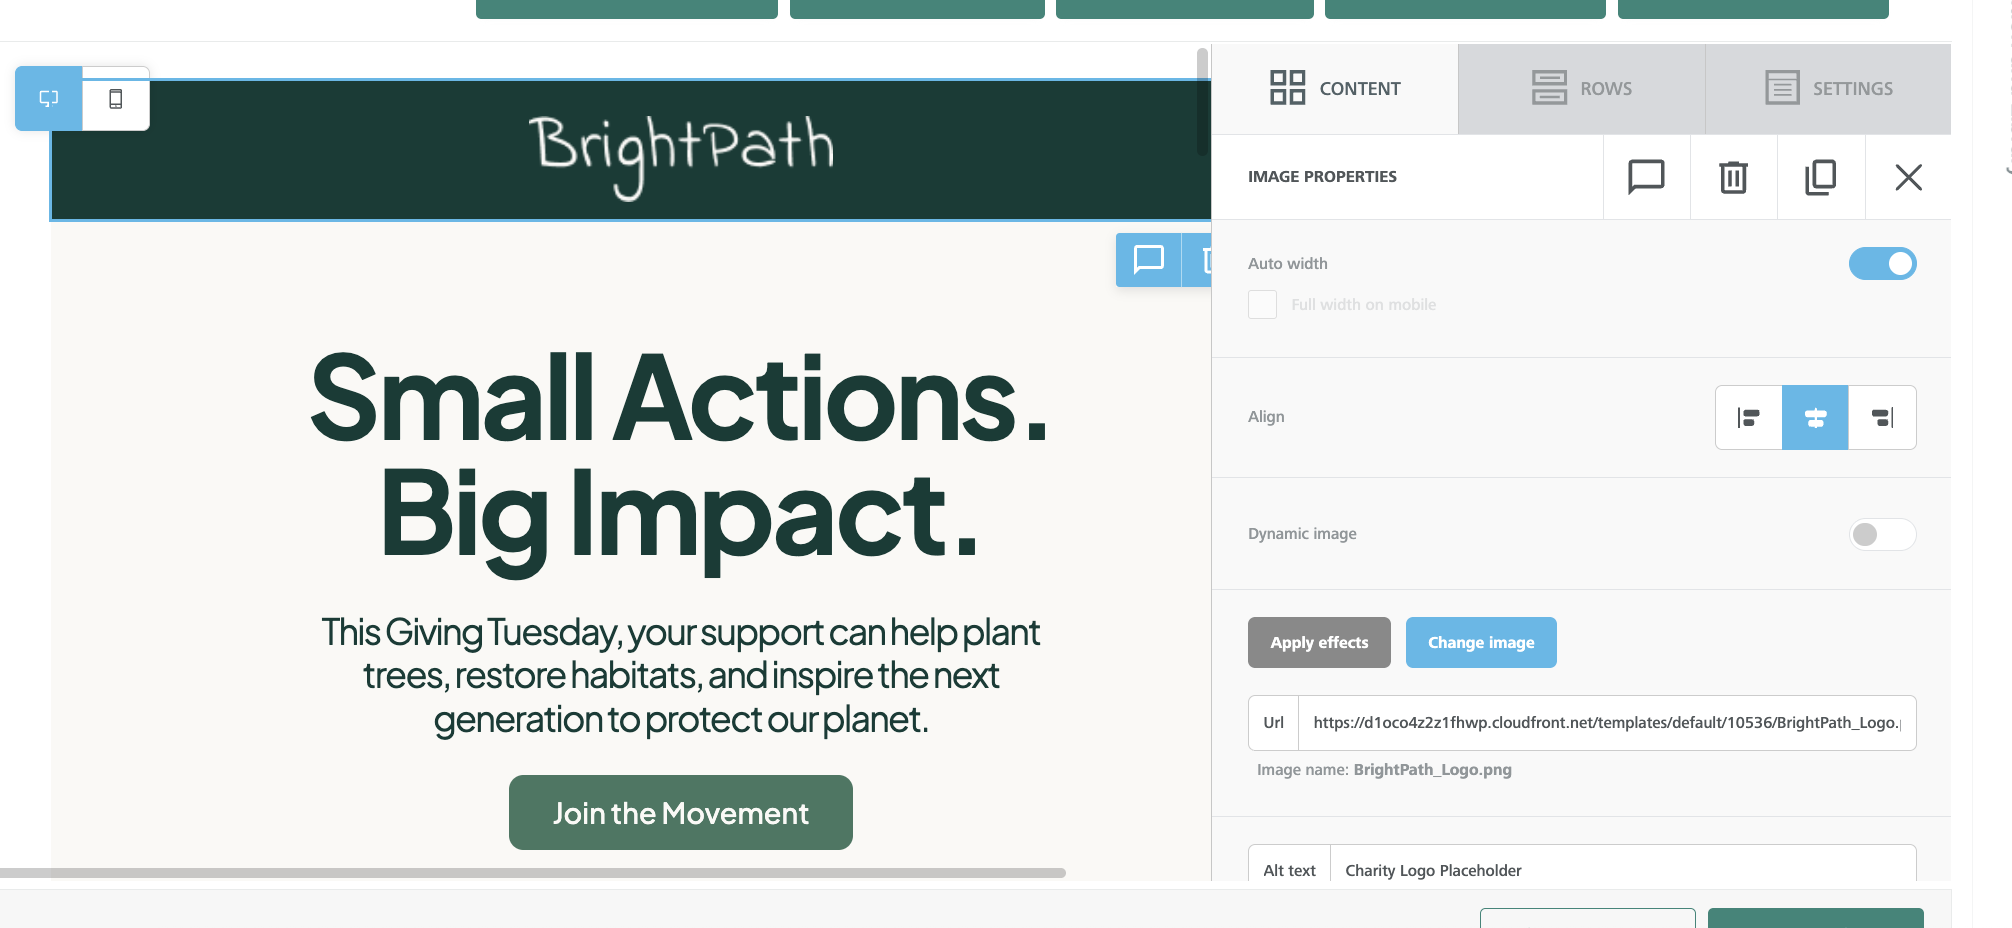
The Content Designer is divided into two main areas: the main message editing stage in the center of the screen (referred to as the "Workspace"), and the properties panel on the right. The right-hand panel serves a dual purpose -- a menu of element types, and a set of properties and options.
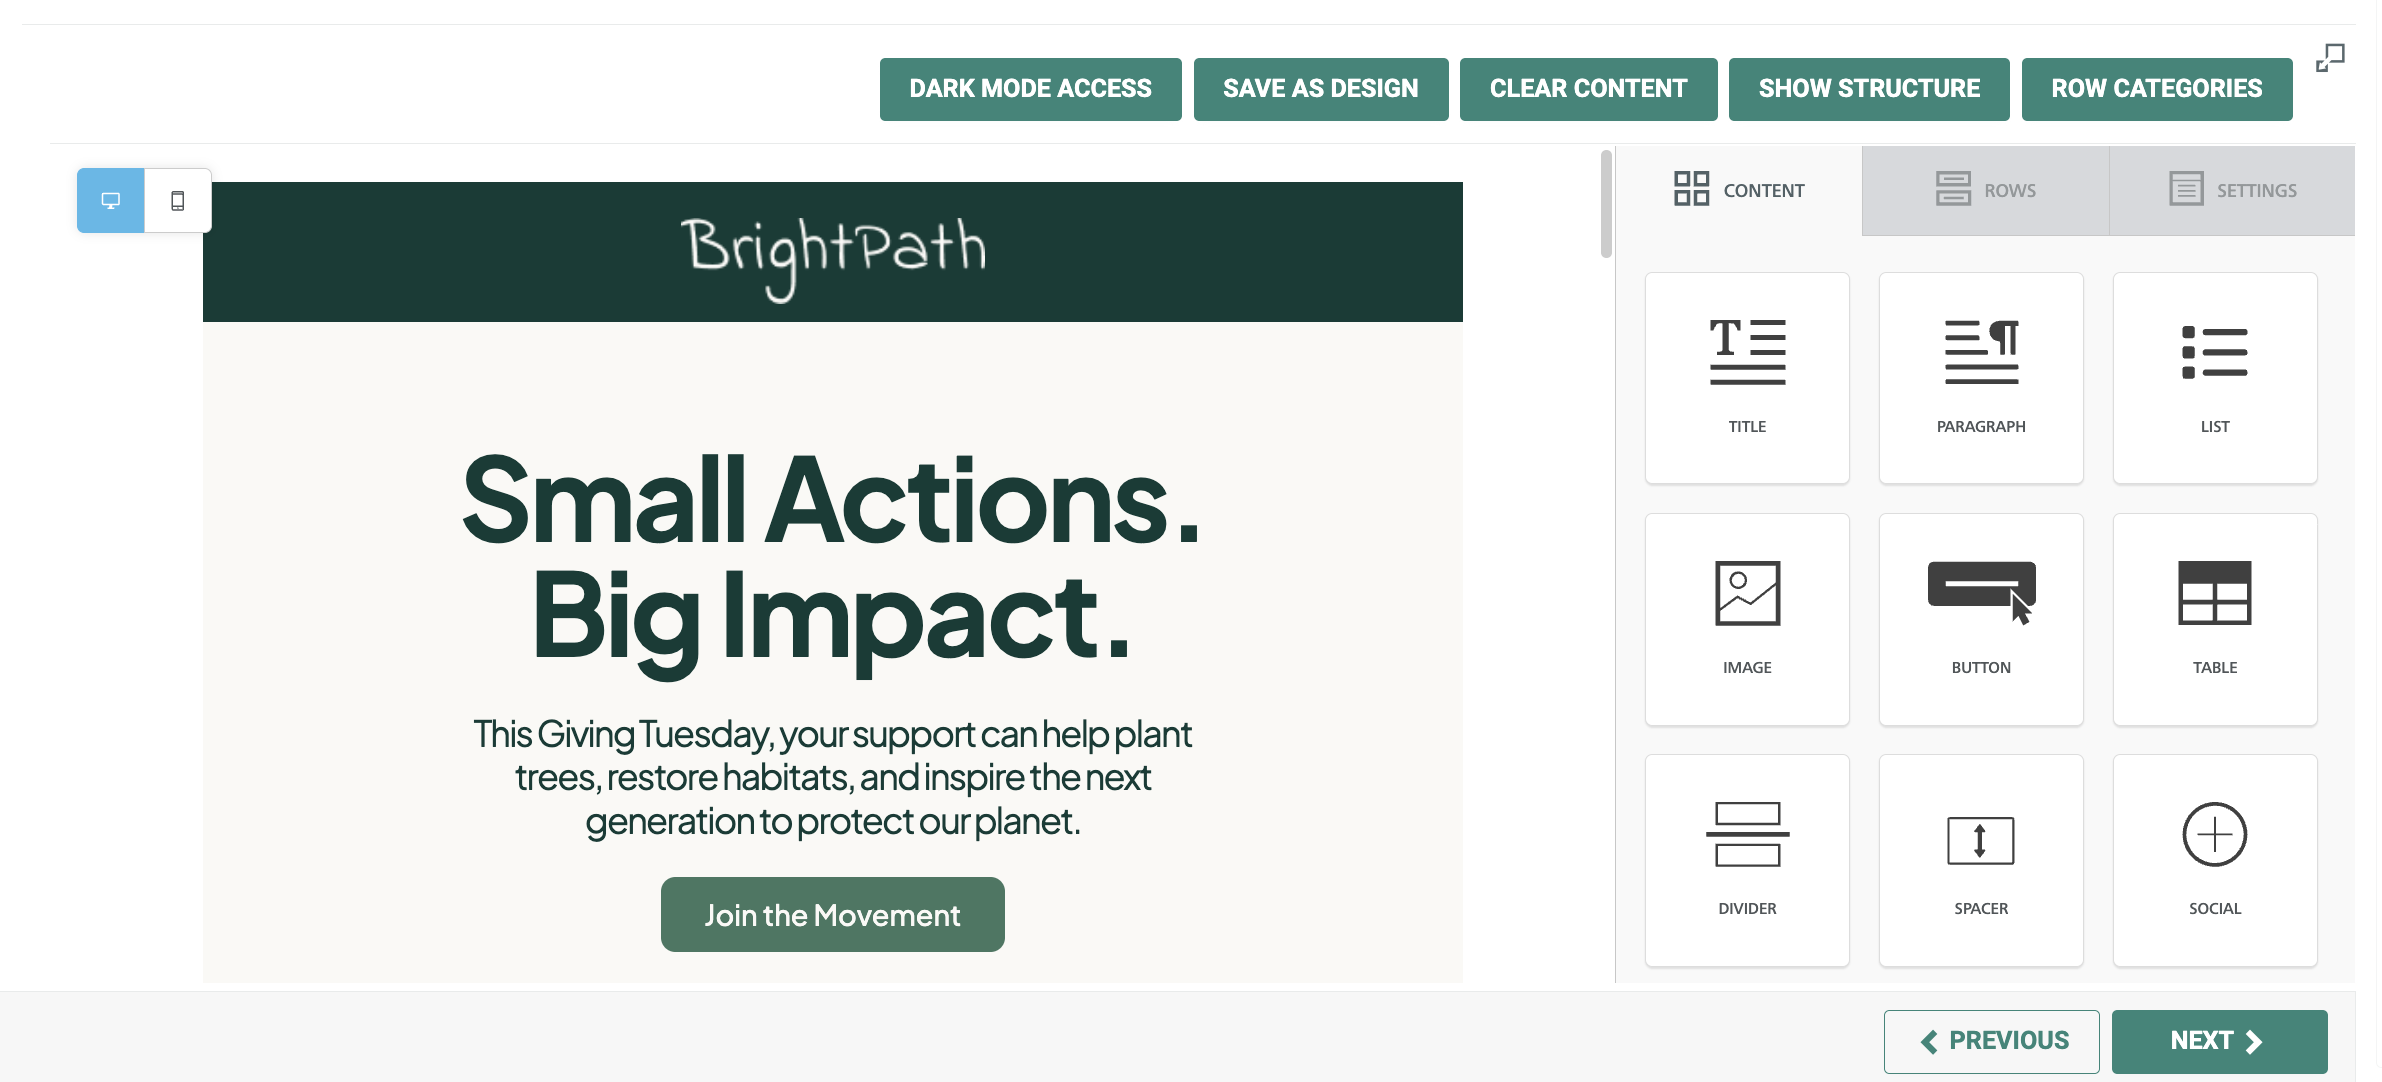
The Content Designer supports a wide range of content elements -- text blocks, images, videos, buttons, etc. In addition, you can insert other Messaging assets, such as Personalization fields, Content Blocks, and Opt-Out Messages. All these different elements are available by selecting the "Content" tab in the right-hand pane (pictured above).
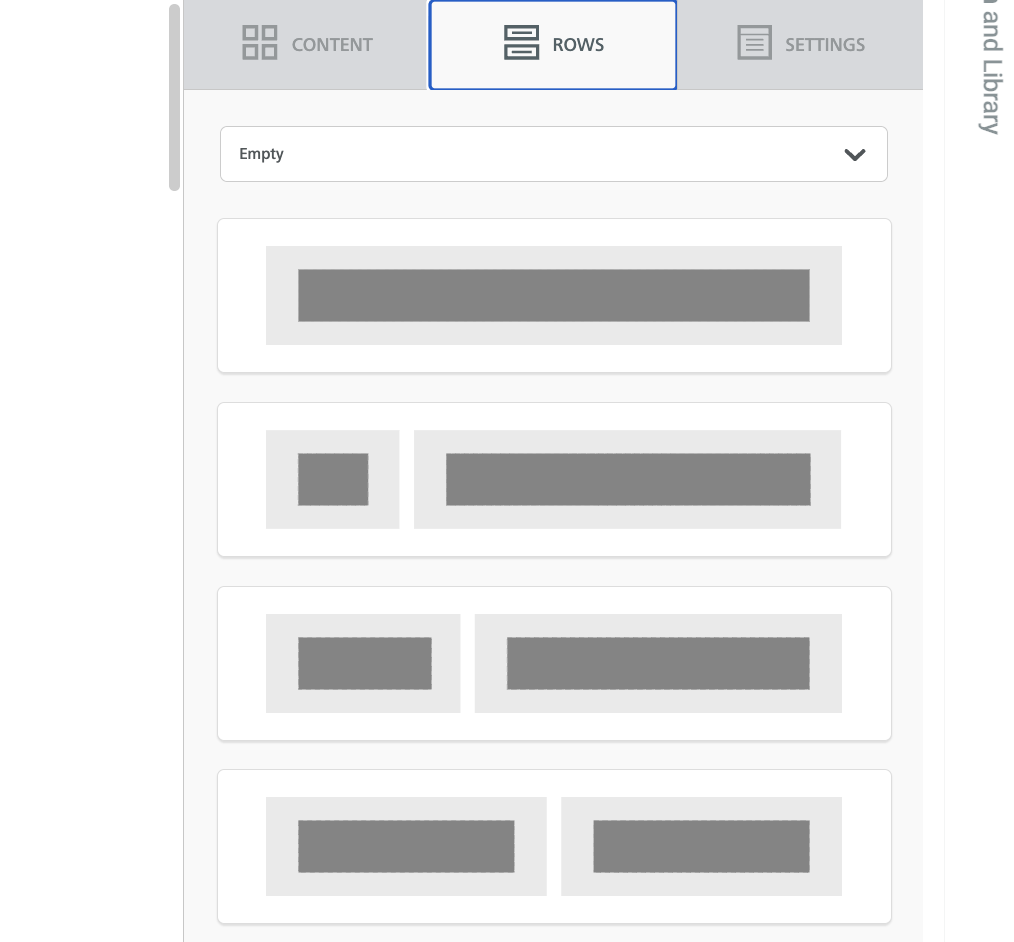
In addition to content elements, the Content Designer allows you to define the structural elements (rows, columns) in your email message. Rows with different structures allow you to organize content in a way that is different from the preceding and following rows.
Structural elements are available by selecting the Rows tab in the right-hand pane (pictured to the right). The Content Designer supports a variety of row designs featuring one, two, three, or four columns.
The third tab -- Settings -- provides access to global, default settings that are applied to all content elements (such as font family or link color).
In general, to use the Content Designer, you drag elements from the right-hand menu, and drop them onto the Workspace. The tool uses highlighting and the label Drag it here to help guide you toward valid drop targets.
If you then click on an element within the Workspace, the property options specific to that element type are displayed in the right-hand panel.
To revert back to the menu of element types, click outside the selected item to de-select it. Or, optionally, click the down-arrow icon within the properties pane.
Other features within the Content Designer include the ability to clone an element, and a "roll back" feature that lets you revert to a previously-saved version.
Advanced edit
From within the Content Designer, you can optionally toggle over to the Content Editor, if you need to view or edit the message's underlying HTML code.
Note: If you toggle over to the Advanced Editor to view the message's source code, you can not toggle back to the Content Designer for this Campaign.
To toggle to the Content Editor -- in the Tool Bar, click Actions > Advanced Edit.
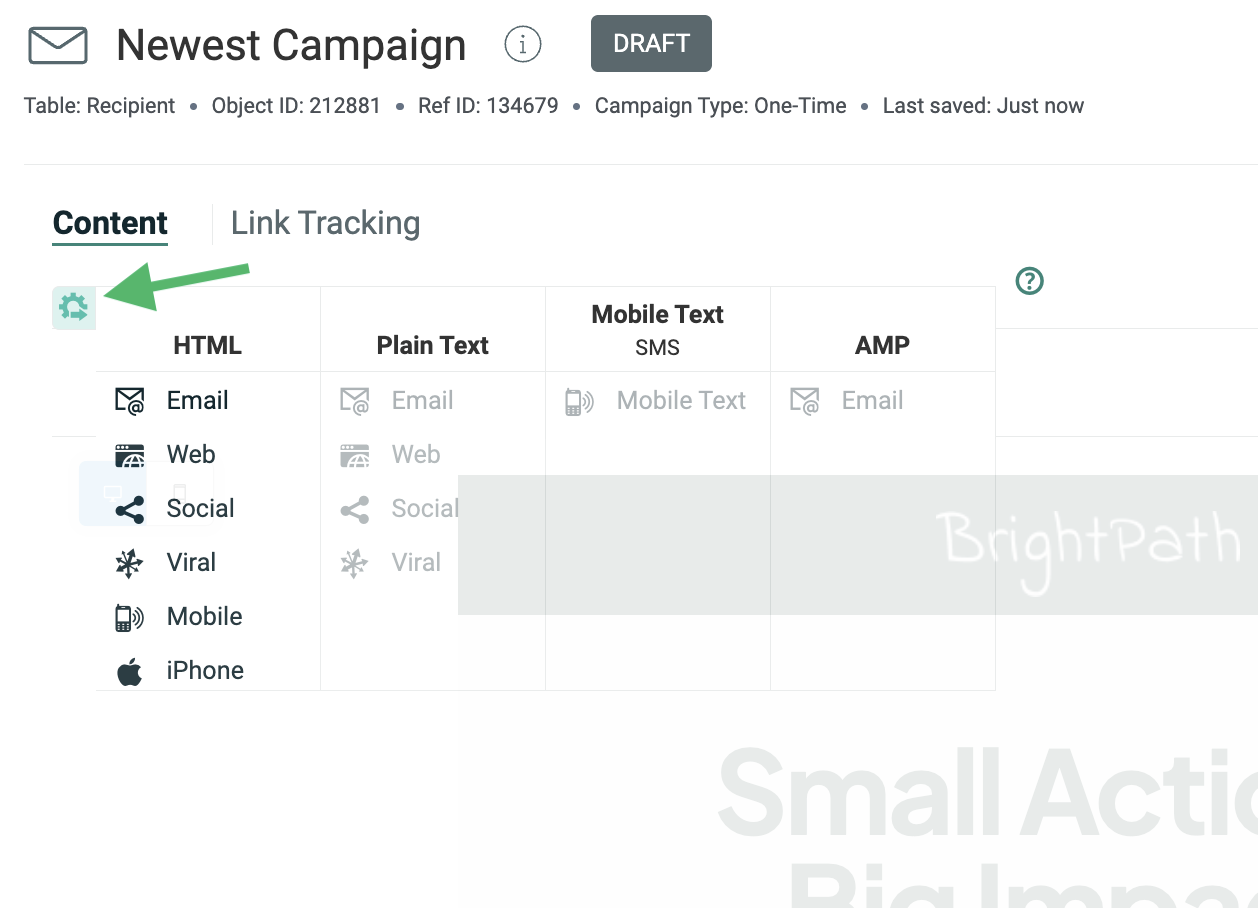
Format versions
Messaging allows you to define HTML and Plain Text format versions of your email message content in order to accommodate the different devices and applications used by recipients to view your message. You can also promote a format version if, for example, you want to define unique content for a specific context, such as "Mobile," "iPhone," or "Social."
In both the classic and Enhanced Workflow versions of the Content Editor, all your different format versions are displayed as tabs across the top of the main Content field. However, the process of enabling or promoting different versions has been modified to make it more graphical and intuitive. First, click the gear icon to bring up the Format Version panel, then simply drag-and-drop a format option into an existing tab, or promote it into a brand new tab.
Preview window
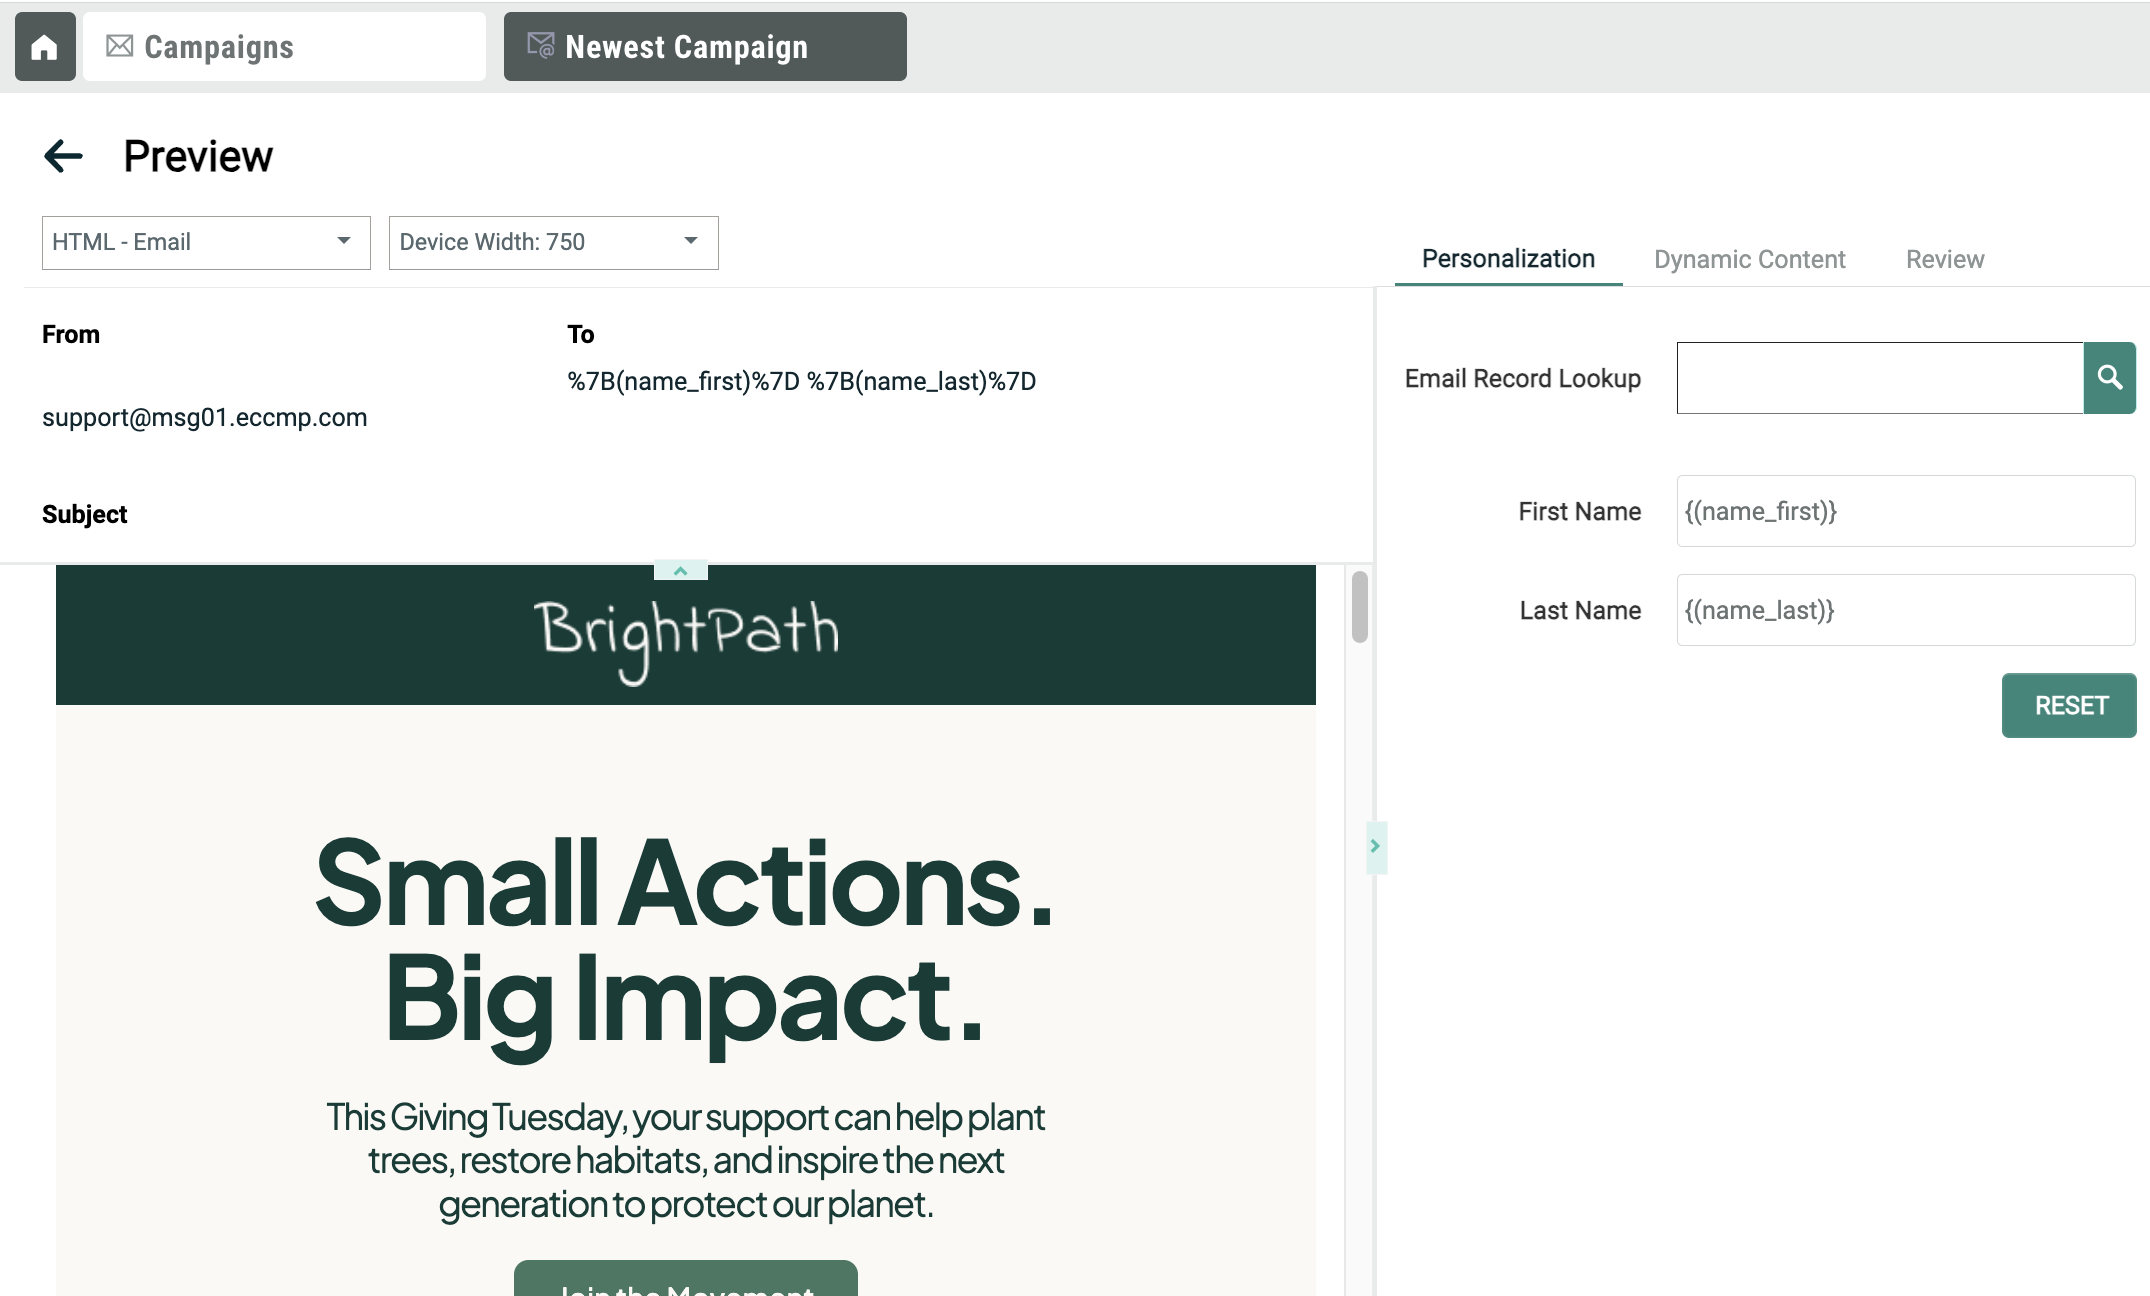
The Preview Window provides you with a full rendering of your email message content, and allows you to test any personalization fields or Dynamic Content contained within the message.
To access the Preview Window, click Preview in the Tool Bar.

The Preview Window lets you view your content across a variety of standard screen resolutions for mobile devices, tablets, and desktop monitors. Using this feature, you can verify that your message is formatted correctly across these different devices.
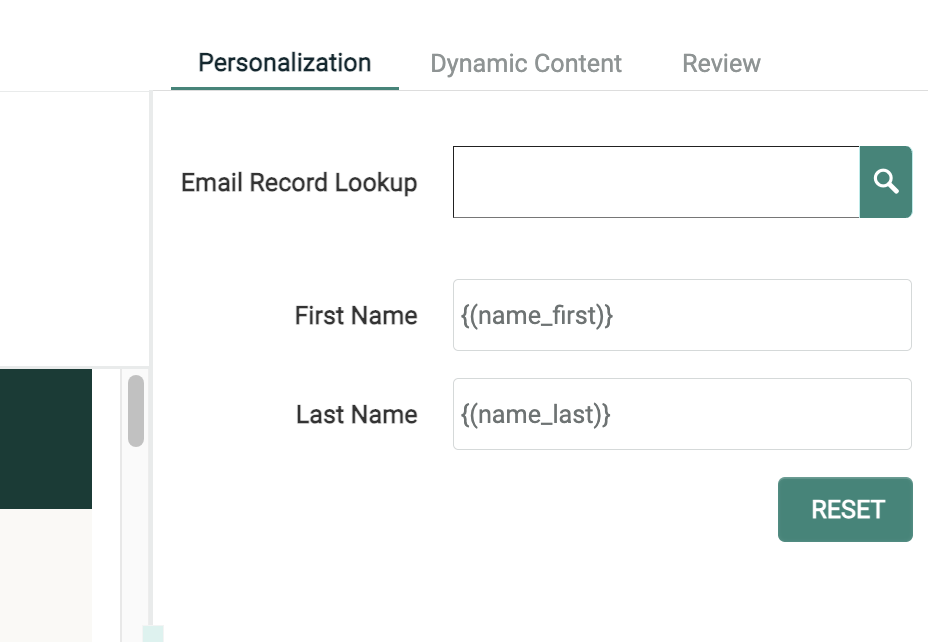
Personalization
If your content contains personalization fields, the Personalization tab within the right-hand pane allows you to enter test values to make sure that the personalized content is displayed correctly. Optionally, you can collapse this section by clicking the blue right-arrow icon to the right of the email content.
The Preview Window has been enhanced to display the email header information (Subject Line, "Friendly To" address, etc.). If you're using personalization fields in the header, you can now test those fields from the Preview Window.
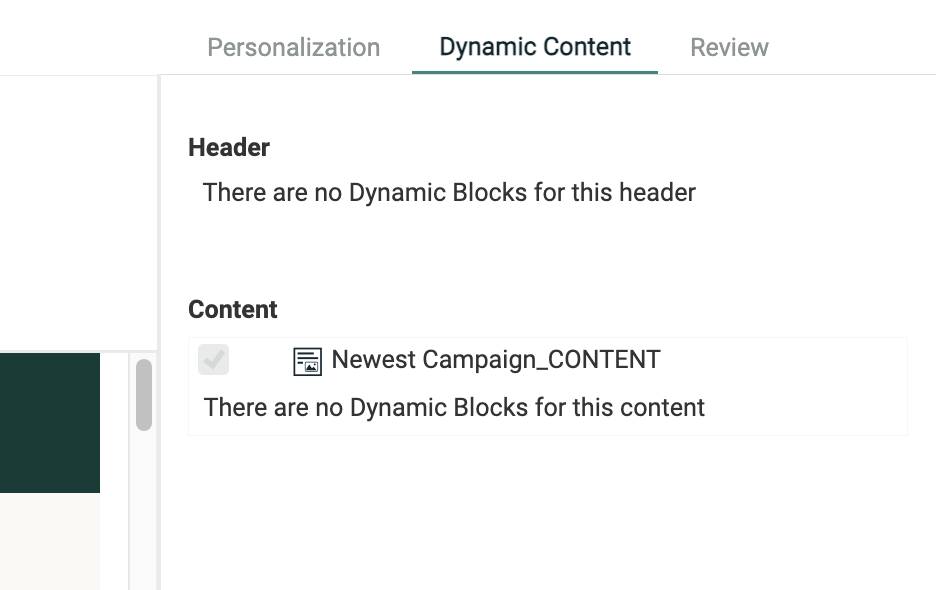
Dynamic Content
If your content contains dynamic content, the Dynamic Content tab within the right-hand pane allows you to test the different content variations. Within this tab, the system displays all of the Content Block-type assets (Content Blocks, Dynamic Blocks, etc.) included within the header and / or message content. You can select which of these assets you want to include within the message preview.
For Dynamic Blocks, the system displays all the Rule / Block Pairs defined with the Dynamic Block. To test a specific Rule / Block Pair, place a check mark next to it. The system refreshes the Preview Window to show how the content appears for the selected Rule / Block Pair.
Review
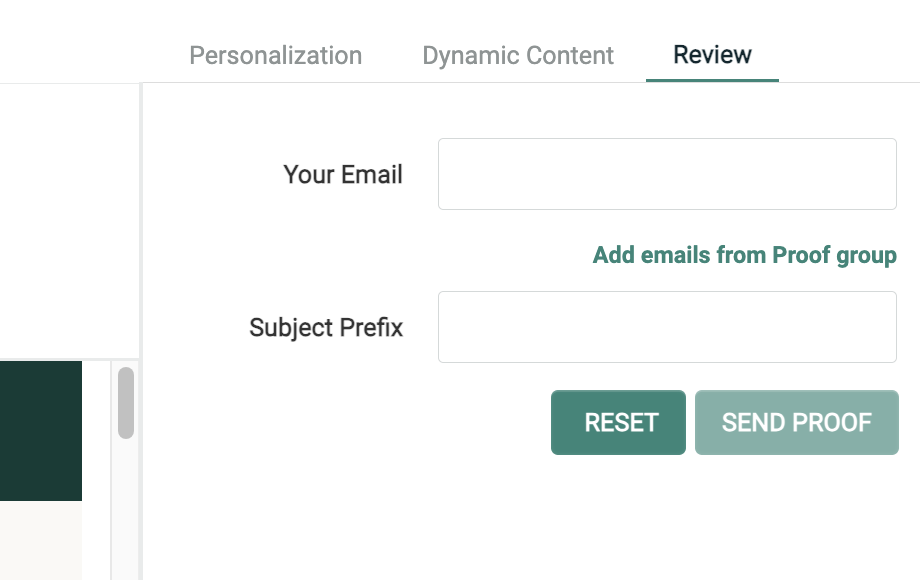
The Review tab allows you to send Quick Proofs.
The Quick Proof method available from within the Preview Window provides similar functionality as the Send Quick Proof option in the Action menu (see Tool Bar), with one notable difference -- the Preview Window method lets you enter custom personalization values. Conversely, the Action menu method of sending Quick Proofs will use default values for any personalization fields in the Campaign content.
Link tracking
One of the key design goals of the Enhanced Workflow Campaign screen is to provide tighter integration between content management and link tracking.
Each Campaign can be configured with specific link tracking details, such as which links to track, what to call those links, and what append codes or Tags to assign to those links. In the classic Campaign screen, content management and Link Tracking were separated, because you had to navigate back to the main Campaign details screen to configure your Link Tracking options.
The Enhanced Workflow version brings the Link Tracking configuration options right into the Content Editor, allowing you to move quickly and seamlessly between your content and your link tracking details.

Link tracking views
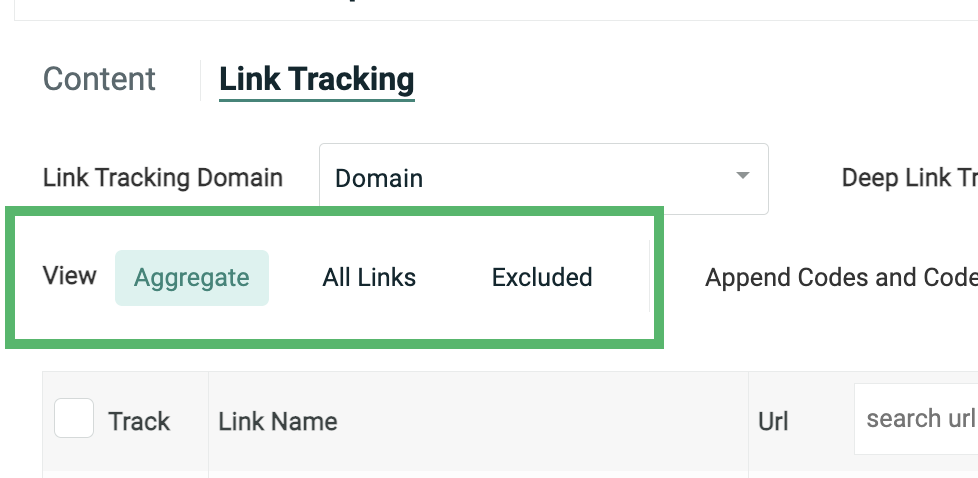
The Link Tracking screen provides three different ways to organize, or to view, your links:
-
Aggregate -- Show unique links
-
All Links -- Show every instance of every link
-
Excluded -- Show excluded (non-tracked) links only
The three views are accessible via the View toggle button near the top of the screen.
From either the Aggregate or the All Links view methods, you can select which specific links you want to use for tracking and reporting purposes. You can also enter an append code or Google Analytics codes, provide a friendly link name, and validate that the links are working.
Aggregate view
By default, the Link Tracking screen displays an "Aggregated" list of all the unique URLs identified within your email message content. For a URL to be considered "unique," it must contain the same URL address AND the same "friendly name." For example, if you have a link to your corporate home page displayed within your email header and footer, and in both cases, you give those links the same friendly name of "Home page," then that URL would appear only once within the Aggregate view. If, however, you gave them different friendly names, such as "Home - Header" and "Home - Footer," then each URL would be listed separately.
The Aggregate view also lists all the places where a link was found within the message content, such as the Main content, and / or within a specific asset, such as a Content Block. If the same URL is used multiple times, the Location column displays a drop-down menu, listing all of the places where it's used. For example, a link might appear within the Main content, and within two different Content Blocks. If a link appears within a Content Block, you can optionally jump directly to the asset detail screen for that Content Block.
Optionally, you can assign tags to a URL when using the Aggregate view. Tags are an organizational tool that can be used to classify links into custom groups for reporting and tracking purposes, or as Filter criteria when building an Audience for a future Campaign.
All links view
The Link Tracking screen also provides an All Links view. This view method lists every instance of every link found within the message content. If the same URL is used multiple times within the content, each instance is displayed separately when using this view method.
If using the All Links view method, the Location column and Format column indicate where this specific instance of this link is located -- either the Main content, or an asset, such as a Content Block, as well as the specific format version.
Optionally, if you click on the value in the Location column, the system displays that content with the link highlighted. If the location is Main, then the Content Editor is displayed; if the location is an asset such as a Content Block, then the asset details screen is displayed.
Exclude view
The third and final method of viewing your links is the "Excluded" view. This method shows all of the links found in the message content that have been explicitly set to "Do not track" through the platform's Link Library screen.
Deep links
A "deep link" is any link that directs a user past the home page of a website or mobile app to content inside of it. For example, you might want to deep link directly to a specific product page instead of to your home page. Deep linking is supported through the use of "Universal Links," which can direct your mobile user to either a website or a mobile app. Universal Links are standard web links that point to both a web page and a piece of content inside your branded app. When a Universal Link is opened on a mobile device, the device's operating system checks to see if any installed app is registered for your domain. If so, the app is launched immediately without ever loading the web page, and the user is directed to a specific page inside of the app. If the user doesn't have your app installed, the web URL is loaded in the device's web browser, as usual.
When configuring deep links in your Campaign, you typically need to provide a deep link "tag." This tag value tells the mobile device what page to open in the app.
Support for deep links is unique to the Enhanced Workflow Campaign screen; deep links aren't supported in the classic Campaign screen.
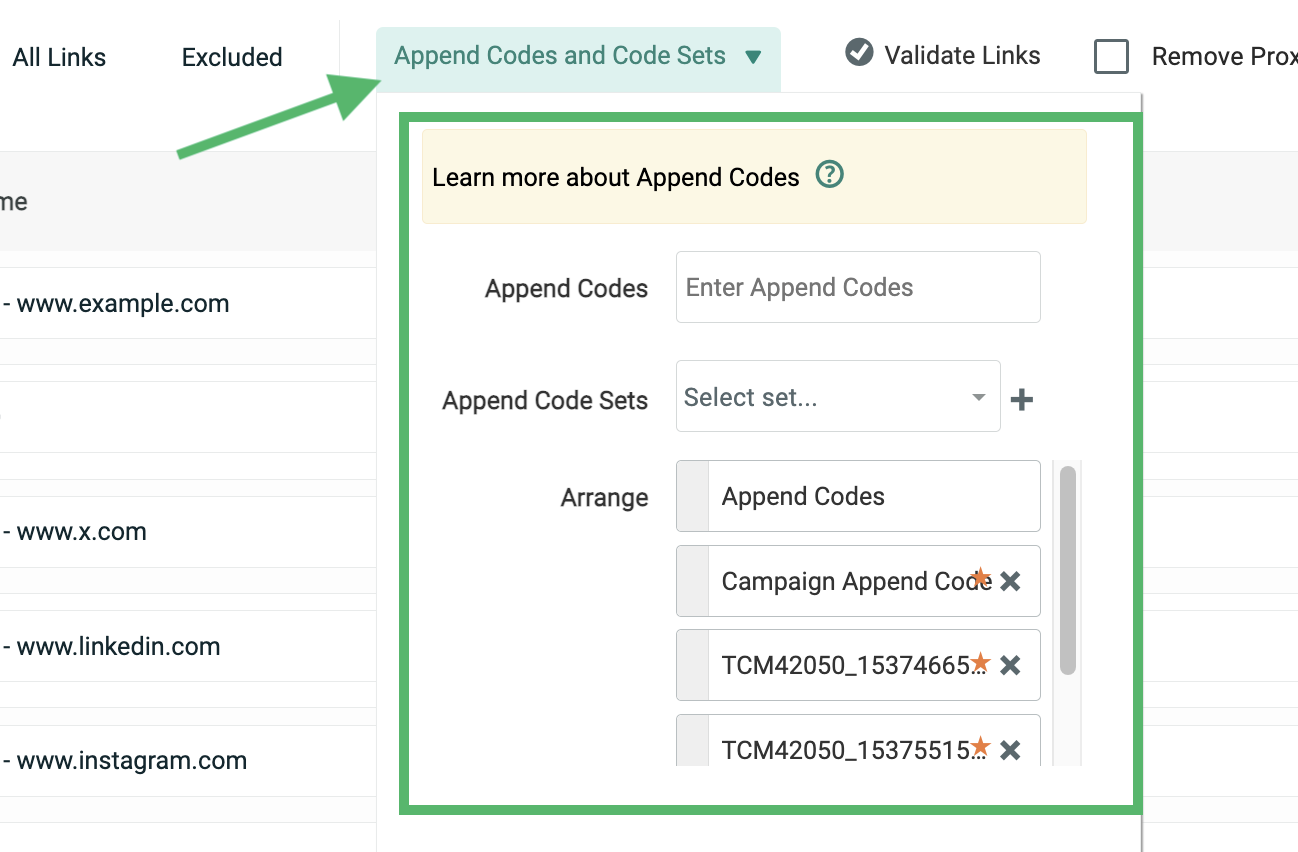
Append code sets
Append Codes are an optional feature used for link tracking purposes through your own tracking system, or through third-party vendors like Omniture and Google Analytics. The Append Codes you assign will be appended to each tracked link in an Email Campaign.
Append Codes can be manually entered at the Campaign level, or they can be defined as repeatable "Append Code sets." Append Code sets can also be defined as "Default," meaning the platform will automatically assign them to every Email Campaign.
Support for Append Code sets is unique to the Enhanced Workflow Campaign screen; Append Code sets aren't supported in the classic Campaign screen.
When you're finished configuring the options in the Content section, you can click the Review tab, or click the Next button at the bottom of the screen to proceed to the Review section.
Review
The Review section is used to define the Campaign schedule, and to audit and review the Campaign prior to launch.
Scheduling
The Campaign scheduling options in the Enhanced Workflow Campaign screen are very similar to the options available in the classic Campaign screen. In both screens, you can configure the following options:
-
Queue Schedule: Used to control the message building phase for Regular One-off and Event-triggered Campaigns. By default, the message building phase will begin immediately after the Campaign is launched. However, there may be a situation where this schedule needs to be delayed to some later date and time . You can also derive the Queue Schedule start date / time by working backwards from the Send Schedule start (i.e., "build messages six hours before the Send Schedule").
-
Recurrence Schedule: Used to control the message building phase for Date-triggered Campaigns. Select Begin Immediately to start this phase when the Campaign is launched; or, select Begin on to select a specific start date / time. This component is also used to set the Recurrence Frequency, which controls when, and how often, the Date-triggered Campaign builds and sends messages.
-
Send Schedule: Used to control the message sending phase for all Campaign types. For a Regular One-off Campaign, the Start on option is selected by default, which prompts you to specify a Send Schedule start date and time. For triggered Campaigns, the Start after Queueing option is selected by default.
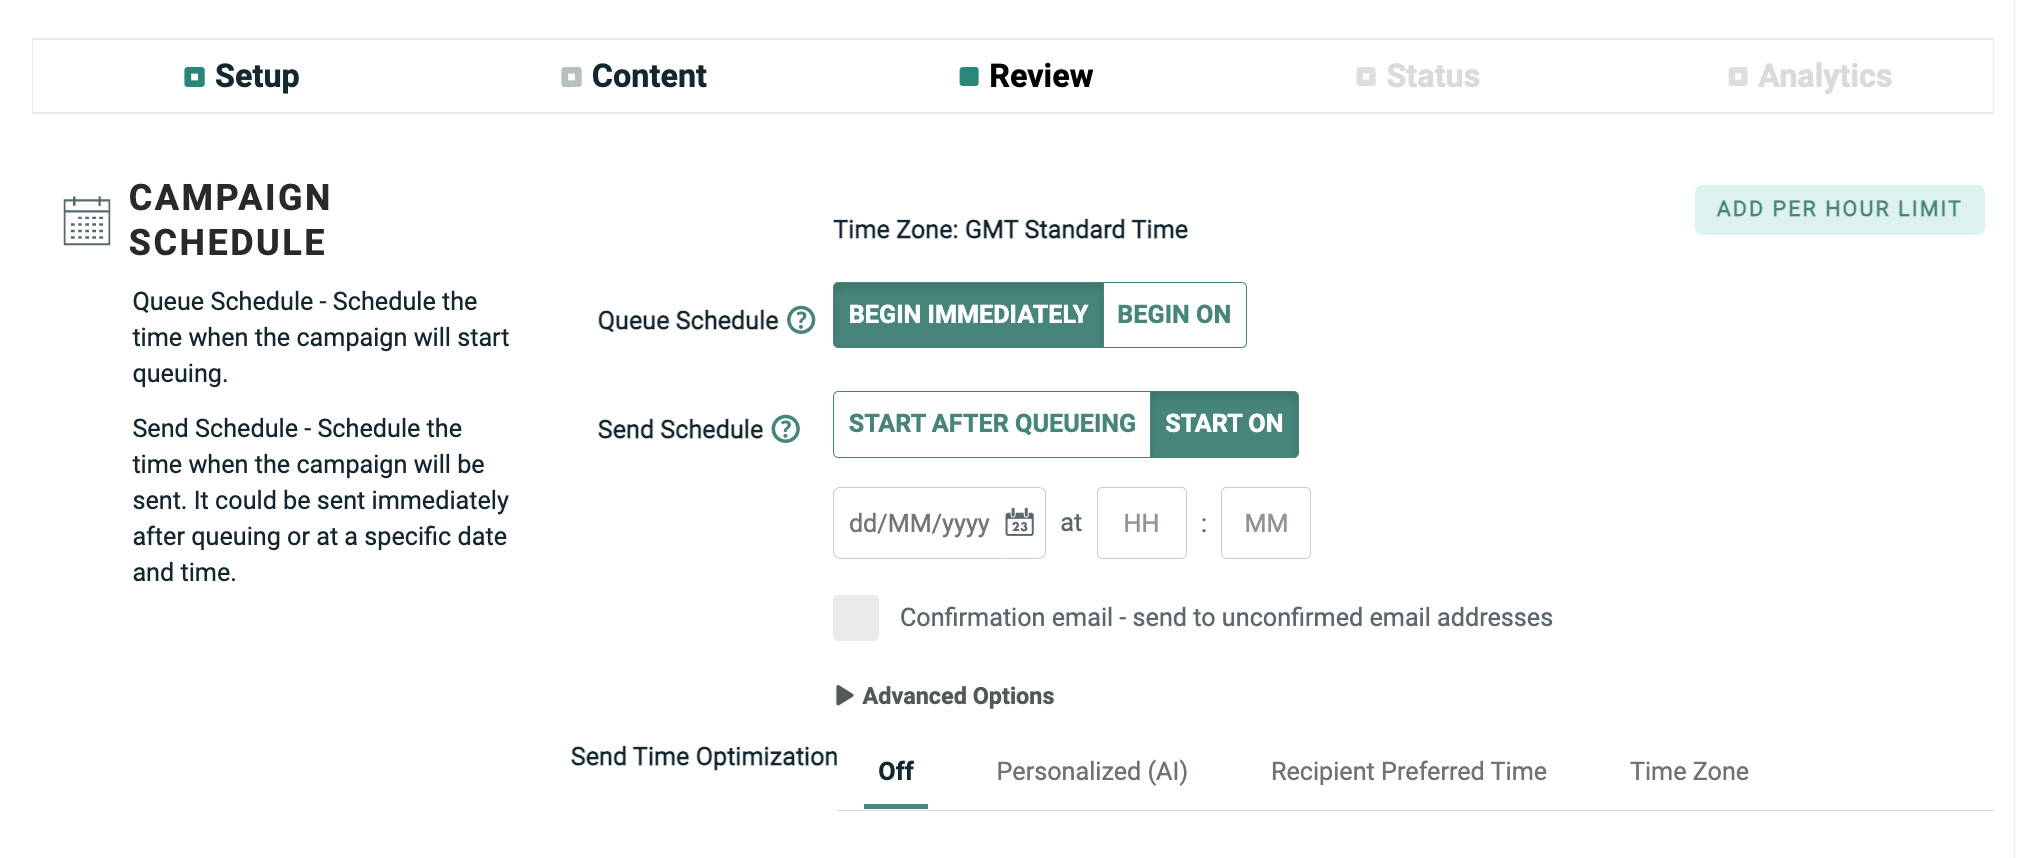
Also, within this section, you can configure the Campaign's per-hour sending limit by clicking the Per Hour Limit link.
Send time optimization
Send Time Optimization (STO) allows you to derive the best time to contact each recipient within the Campaign's audience.
Cheetah Digital will deploy messages to each recipient based on their preferred time of day. The platform will hold messages in the queue until the recipient's preferred send time is reached, which may cause the total Campaign deployment to take longer. As an example, let's say you launch a Campaign at 11:00 AM, and a recipient has a preferred send time of 8:00 AM. The platform will hold this message in the queue until 8:00 AM the next day, then send it.
If the STO process is unable to identify a preferred sending time for a recipient, or if STO is unsupported for a recipient, the platform will revert to using the Send Schedule defined for the Campaign.

Messaging supports several options for Send Time Optimization:
-
Personalized (AI): This option utilizes Machine Learning models based on click or open data to determine the optimal delivery time based on recipient behavior and email engagement.
-
Postal Code: This option utilizes a recipient's Postal Code to optimize Campaign deployment based on each recipient's local time. To use this option, the Campaign's source table must have a dedicated Postal Code field.
-
Recipient Preferred Time: This option optimizes Campaign deployment based on data imported into the platform from a third-party source. The Preferred Time must be stored in a Date / Time field.
-
Time Zone: This option optimizes Campaign deployment based on each recipient's local time zone. To use this feature, the Campaign's source table must have a dedicated Time Zone field.
Proofing & auditing
From the Enhanced Workflow Campaign screen, you can send Standard Proofs and audit the Campaign counts prior to launch. The functionality available within this section is similar to the classic Campaign screen, but the navigation and workflow is different.
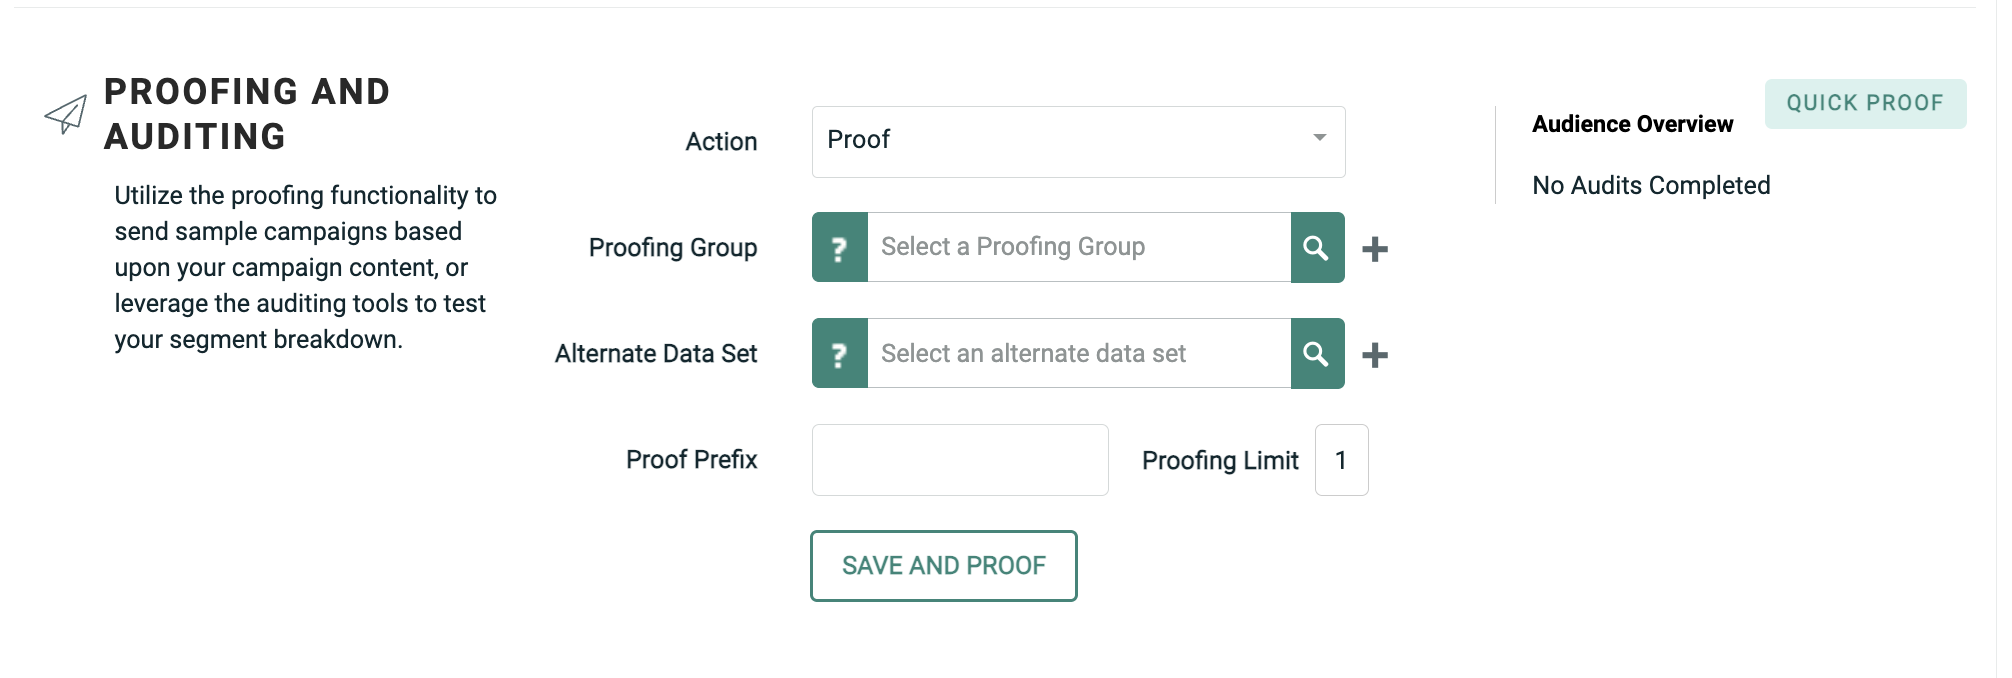
All of the Standard Proofing and auditing functions are available from the Action drop-down menu -- proof only, audit only, or both proof and audit -- which allows you to control your entire pre-launch review process from one place. Once you make your selection from this menu, the screen is refreshed to present you with the relevant options, such as selecting a proofing group, or setting up audit cross tab reports. You can then execute the selected action.
Conversely, in the classic Campaign screen, the Proofing and Auditing features are split across two separate screens, available from the Function Menu.
Also within this section in the Enhanced Workflow Campaign screen, you can send Quick Proofs by clicking the Send Quick Proofs link. Quick Proofs allow you pick a specific content variation, then send a one-off proof to either a Proofing Group, or to a specific email address (Quick Proofs are also available from within the Preview window).
The results of your proof and / or audit steps are displayed within the Statistics History section.
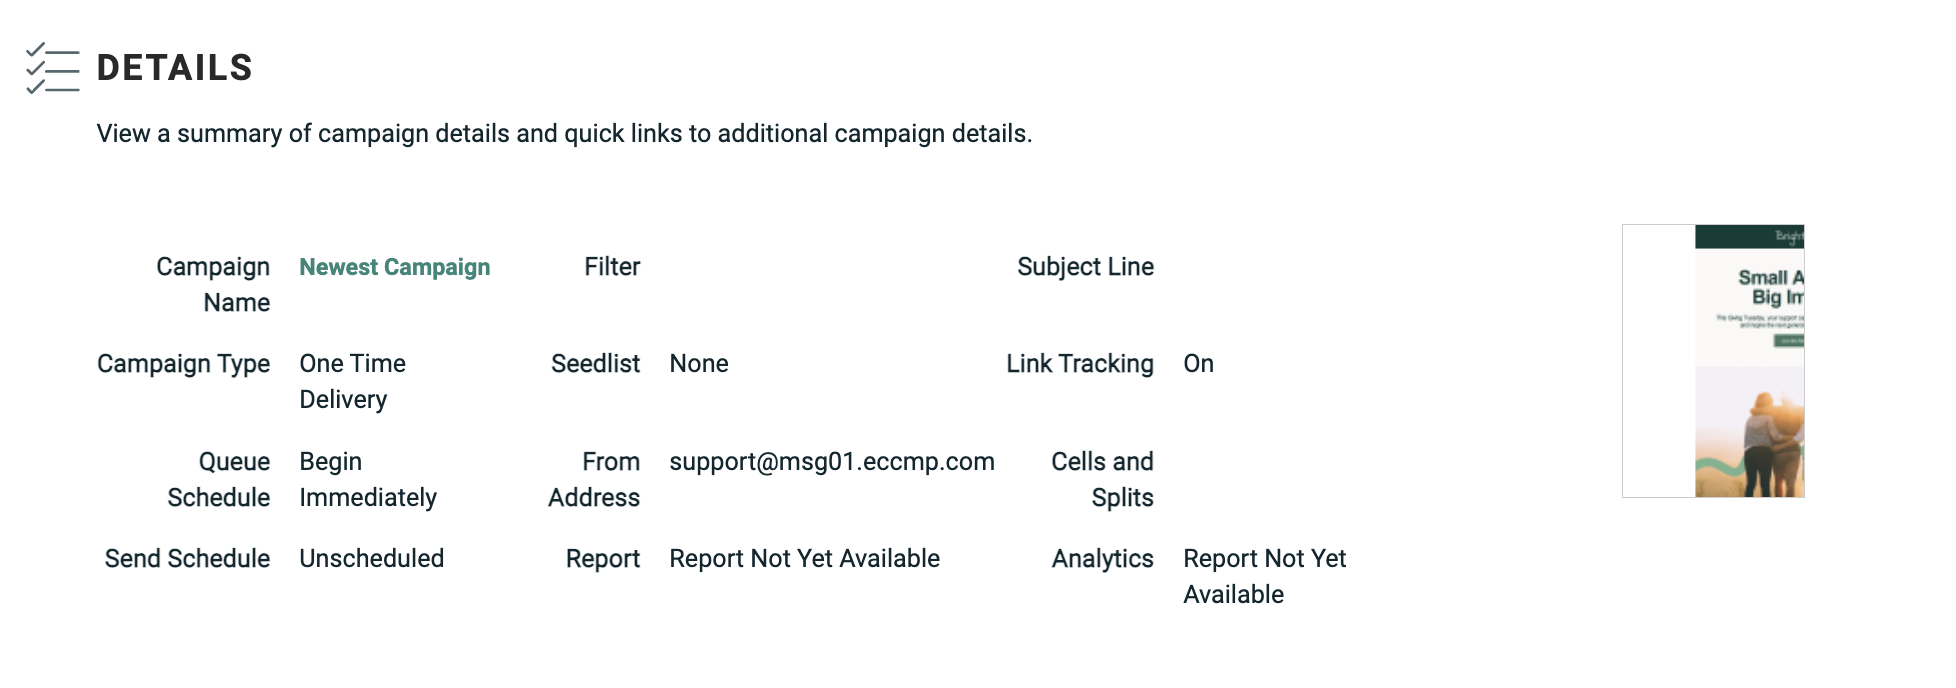
Details
The Details section is unique to the Enhanced Workflow Campaign screen, and is intended as a final quality assurance check prior to launching the Campaign. The Details section provides a high-level overview of the entire Campaign, including the schedule, subject line, audience Filter, and a thumbnail of the message content.
Launch
When your Campaign is ready to launch, click the Launch Campaign button at the bottom of the screen, or select Actions > Launch Campaign from the Tool Bar.